Think Better with AI
Documentation and answers to
Frequently Asked Questions
Quick Links
Getting Started
STS's Structure
STS's Structure:
Teams: Top-level organization, controlling access to work
Folders: Exist within teams, containing related boards
Boards: Where actual work happens, found inside folders
Frames: Sections within boards, often used for workflow steps
Lists: White areas within frames, containing cards
Cards: Individual items or ideas within listsThis hierarchical structure allows for organized collaboration and controlled sharing of information across different levels of your organization.You can utilize pre-made templates or create custom boards for specific projects or decision-making processes.
Terminology
Board
A board is where you do your work or store your knowledge in STS. It consists of your frames, lists, card, and AI Associates
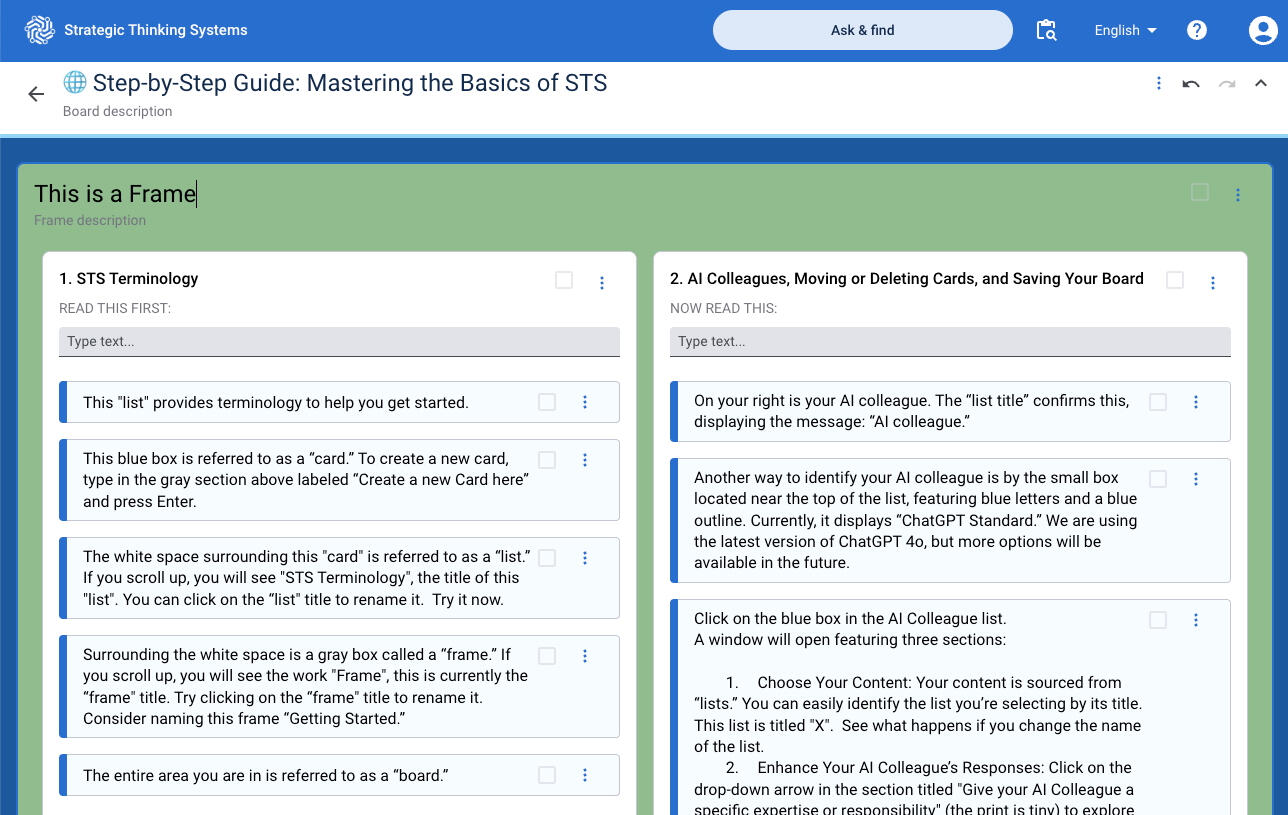
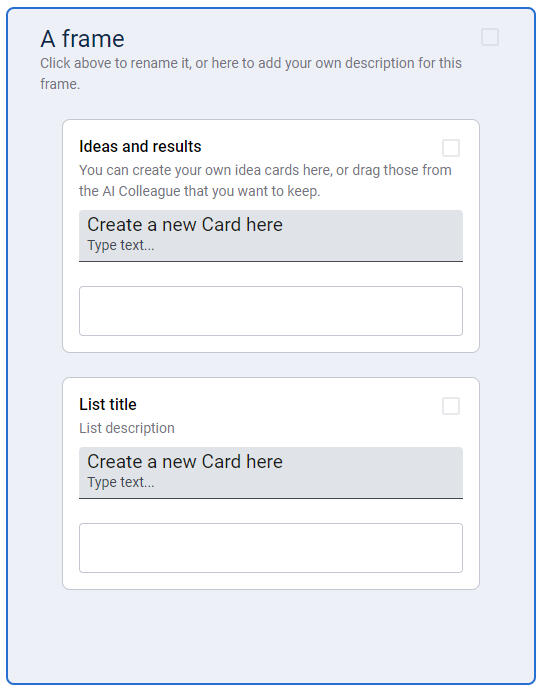
Frame
A frame is the top-level structural component of your boards.
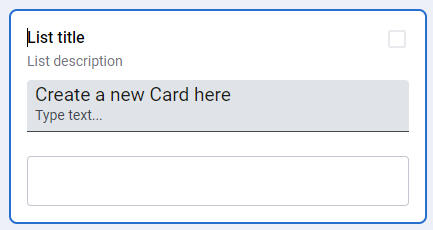
List
A list is a container for text, ideas and concepts.
Some lists are controlled by AI colleagues, other are entirely the purview of you, the user.
Card
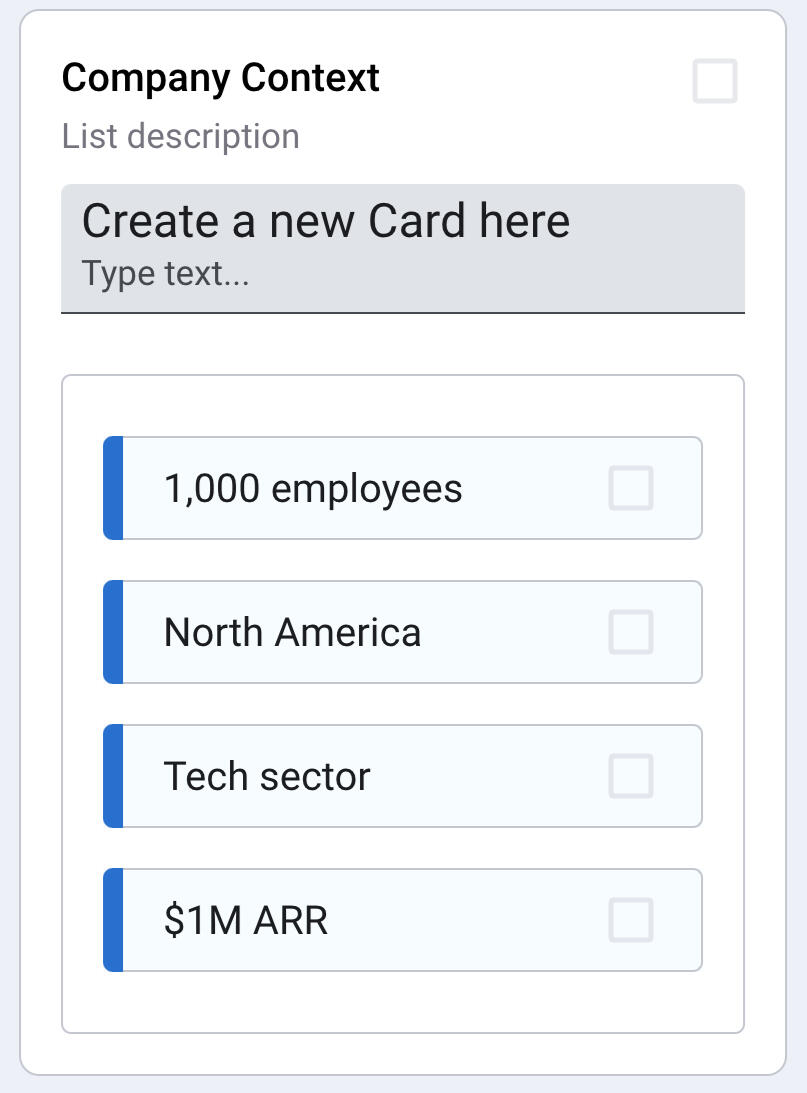
A card is a piece of text, an idea or a concept.
You can modify it and drag it around the STS interface.
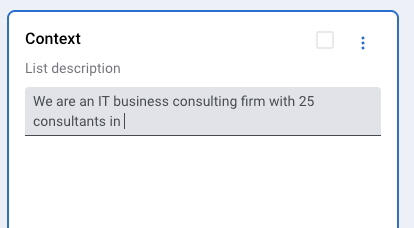
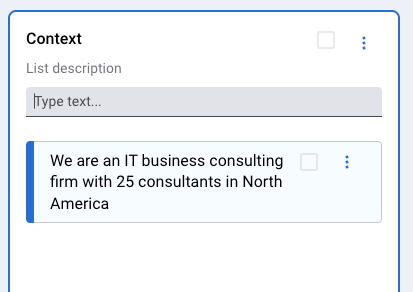
In this example, each card represents an aspect of the company. Giving AI Companions context like this helps it understand who you are and how it can help.
Ask & Find
We've recently introduced a powerful new tool that has two key features: Ask & Find
1. Ask: Ask AI questions directly without having to create a board first. Treat it like an AI chat, but with the ability to create a board with the resultsm, if you choose
2. Find: Search for content across all your Teams, Folders, and Boards. A great way to find previous work quickly & easily
Ask
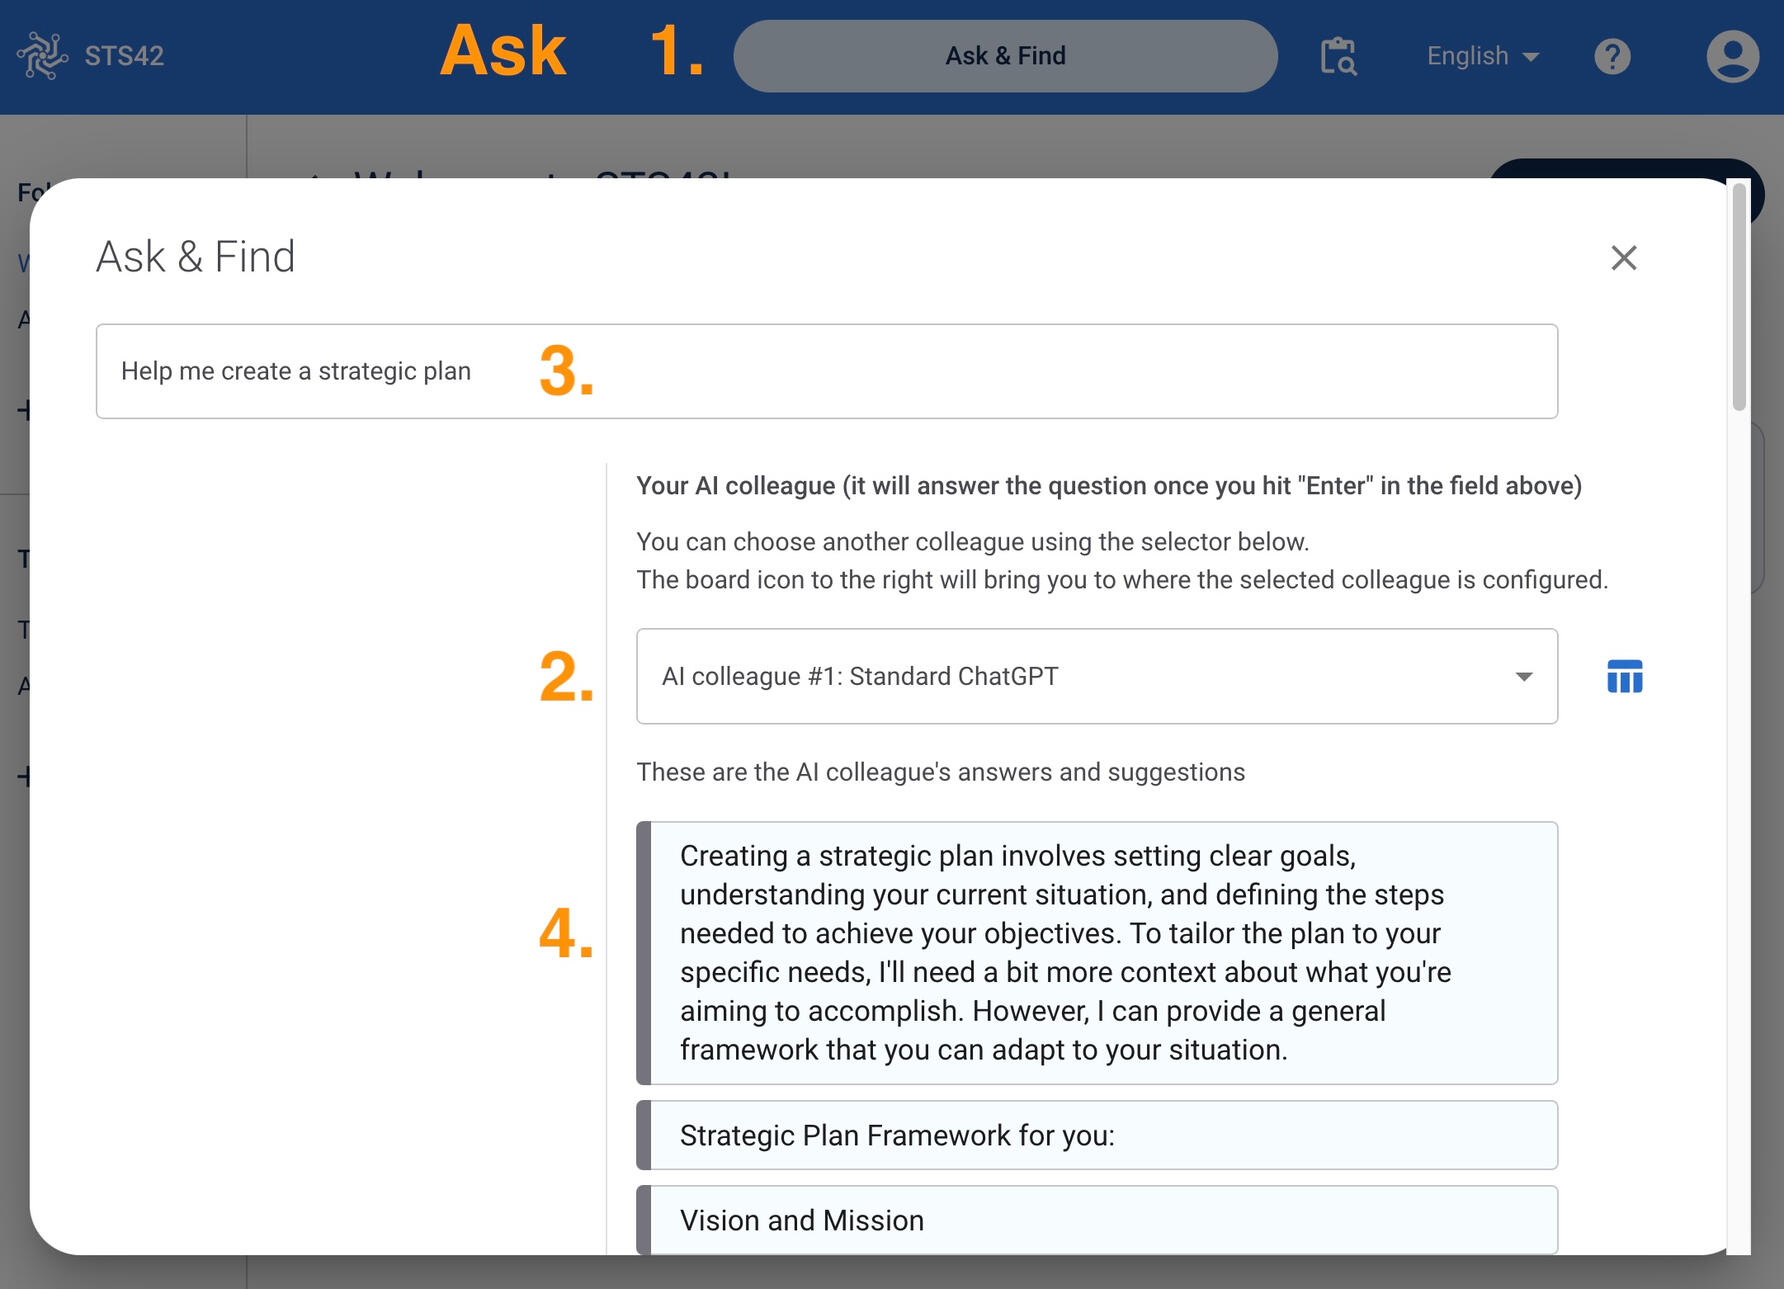
Ask AI questions directly without creating a board first1. Click on the "Ask and Find" field in the top navigation bar.
2. Choose which colleague you would like to ask (default is Standard ChatGPT)
3. Type your search query or question and press Enter
4. Your results will be just under the colleague. Each line will be an individual card.If you would like to save the responses as a board, you can click the "Save to Board" option and a new board will be created.Ask & Find allows you to quickly get AI assistance without the overhead of creating and naming a new board first, making it ideal for quick questions or exploratory thinking.
Find
Search for Teams, Folders, or Boards across STS1. Click on the "Ask and Find" field in the top navigation bar.
2. Type your search query or question and press Enter
3. Your search results will be found just under your query to the the left, categorized by Teams, Folders, and Boards

Building Workspaces
Creating a Team & Adding Members
Teams are groups of people who collaborate on boards together.➙ Each team has its own members.
➙ STS users can create new teams or be added to existing ones.
➙ Users can belong to multiple teams simultaneously.
You have the control to share boards with only those you want with teams. For example, if you have boards that you want only for the operations team, you can create an "Operations team" board and only add operations team members. No one will have access outside of that team.If you want to keep some boards private to you...
you can create boards within a team with only you as a member. This is a best practice when you don't need external input as you do your research or discovery work. When it is time to share that work, you can save the board and add it to the appropriate team or shared folder.
To Create a New Team
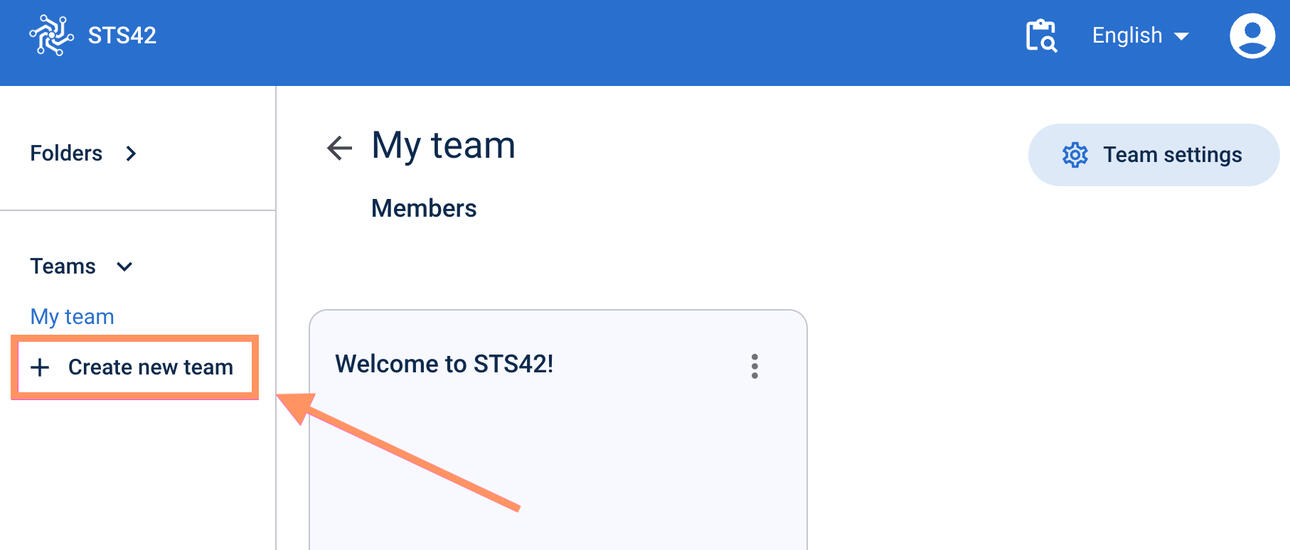
1. From the main page, click "Create new team"
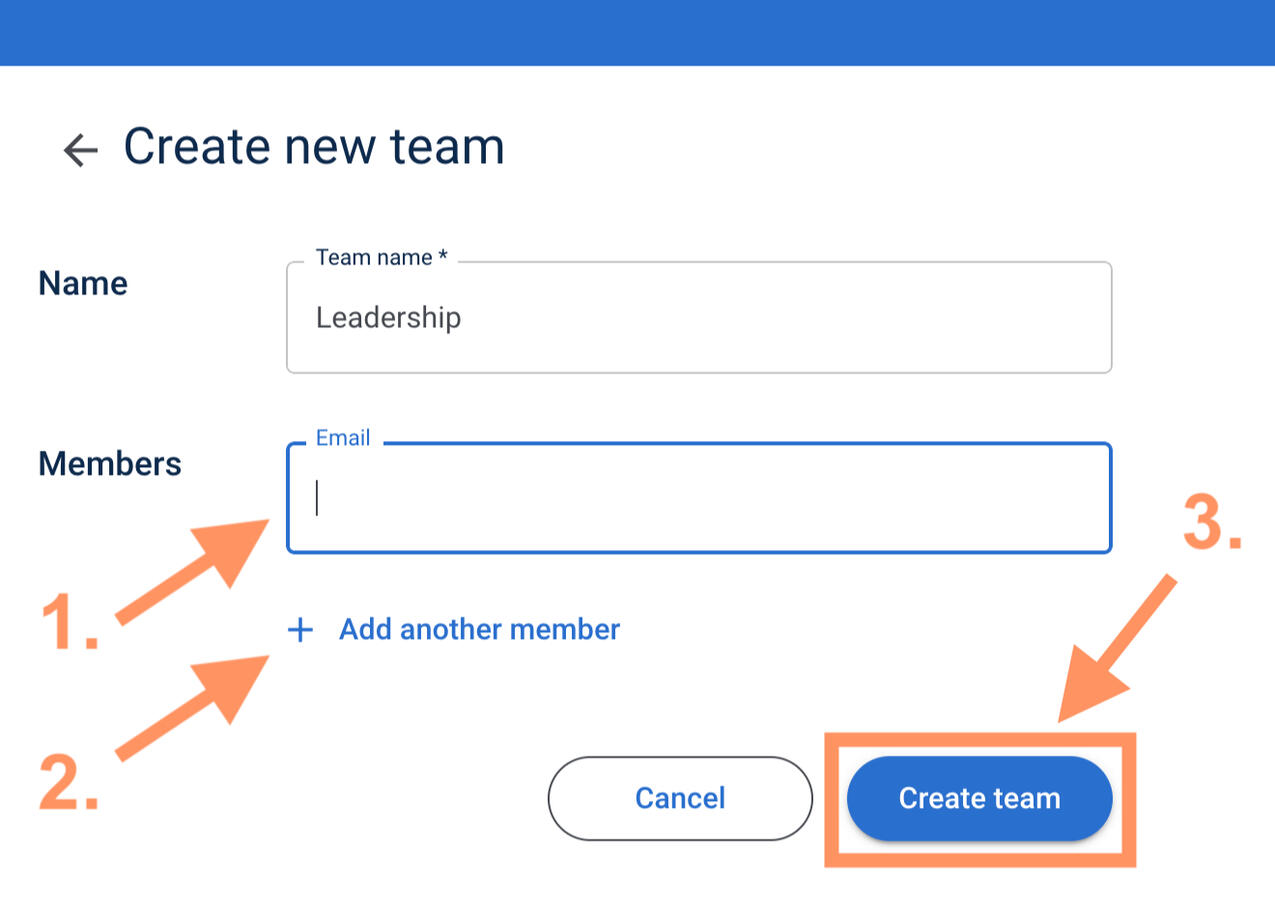
2. Give the team a name
3. Add the email of the first team member (make sure to add emails that have registered accounts, or you will receive an error message)
4. Click "Add another member" for each additional member
5. Click "Create team"You are now ready to add folders to the team. 😃
To Add Members to an Existing Team
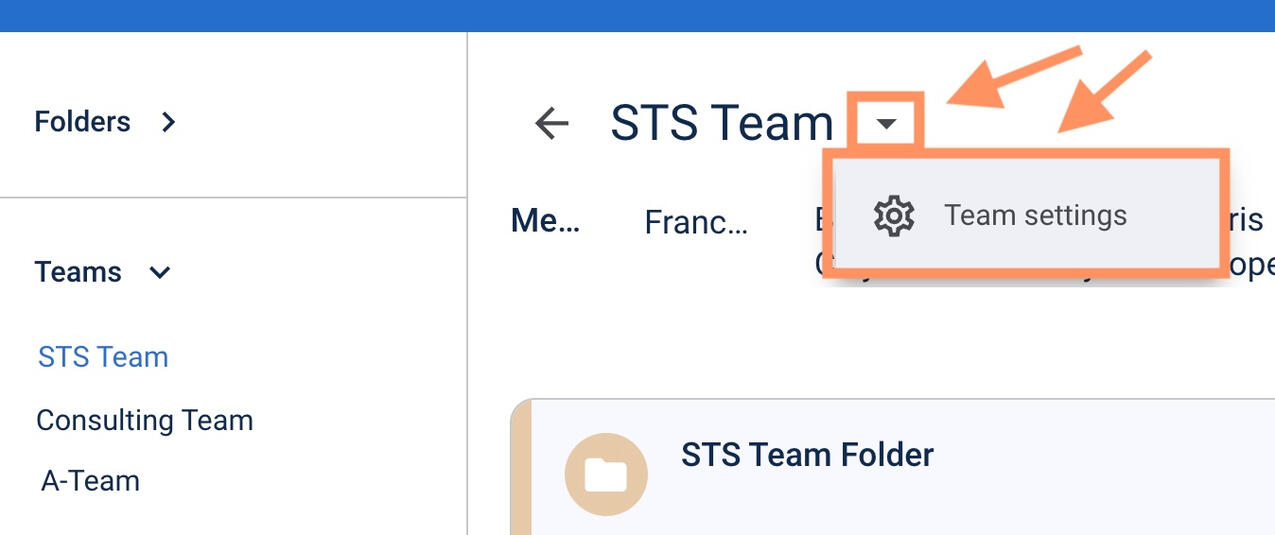
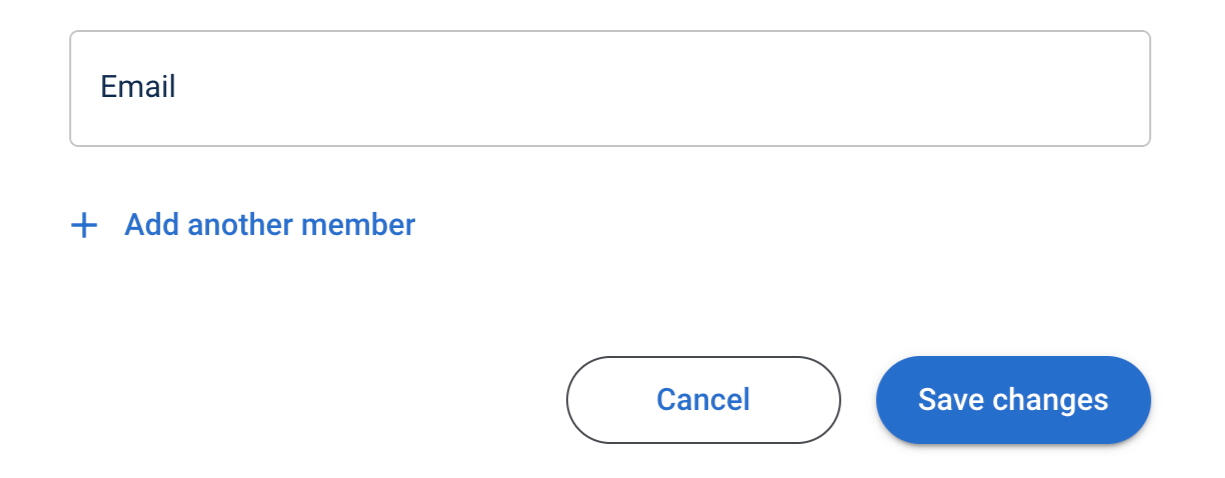
1. Select a Team, either in the left side column or while in a folder, select the team under the folder name2. Click the drop down menu to the right of the team name3. Click "Team settings"4. Add the team member email address they used to create an account5. Click "Save changes"
Creating a Folder
Folders are where you keep your boards.➙ Each folder is a part of a team.
➙ You can create folders for companies, clients, departments, projects, and so on. Just think of them as a folder that keeps all your boards that share a common theme or category.
➙ Remember, you can control who has access to the folder by which team you add the folder to.
➙ Folders can house as many boards as you like
To create a new folder:
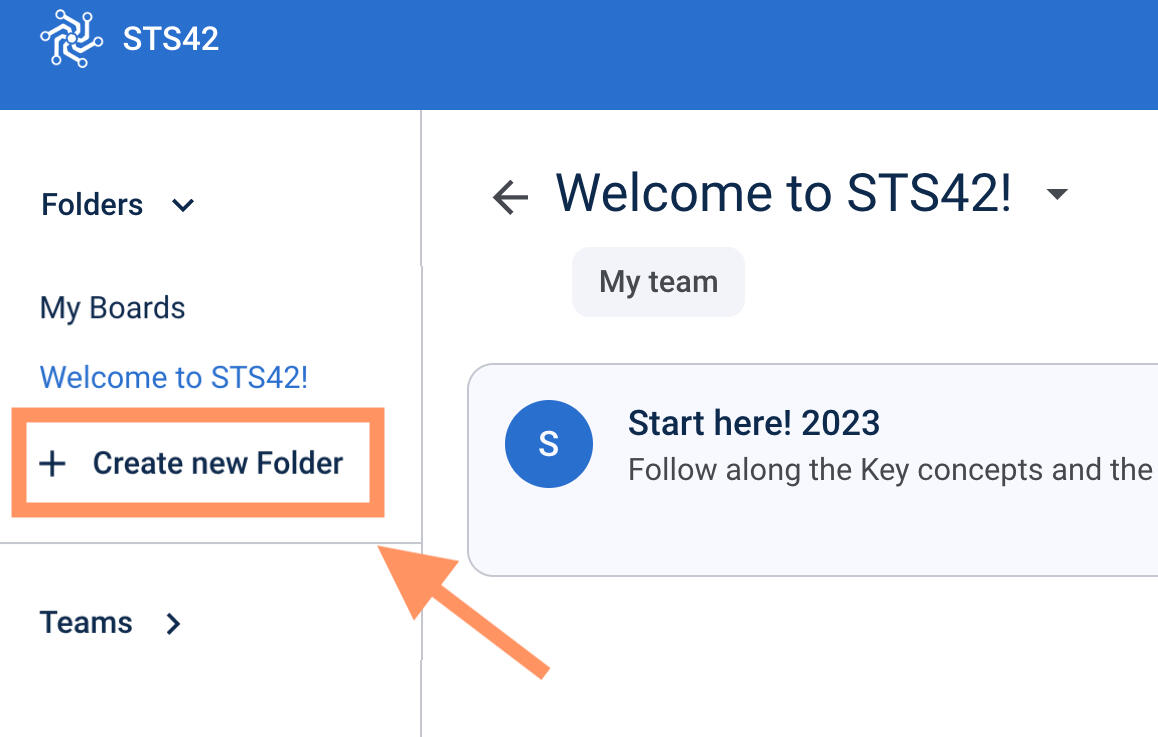
1. From the home page click on "Create new folder"
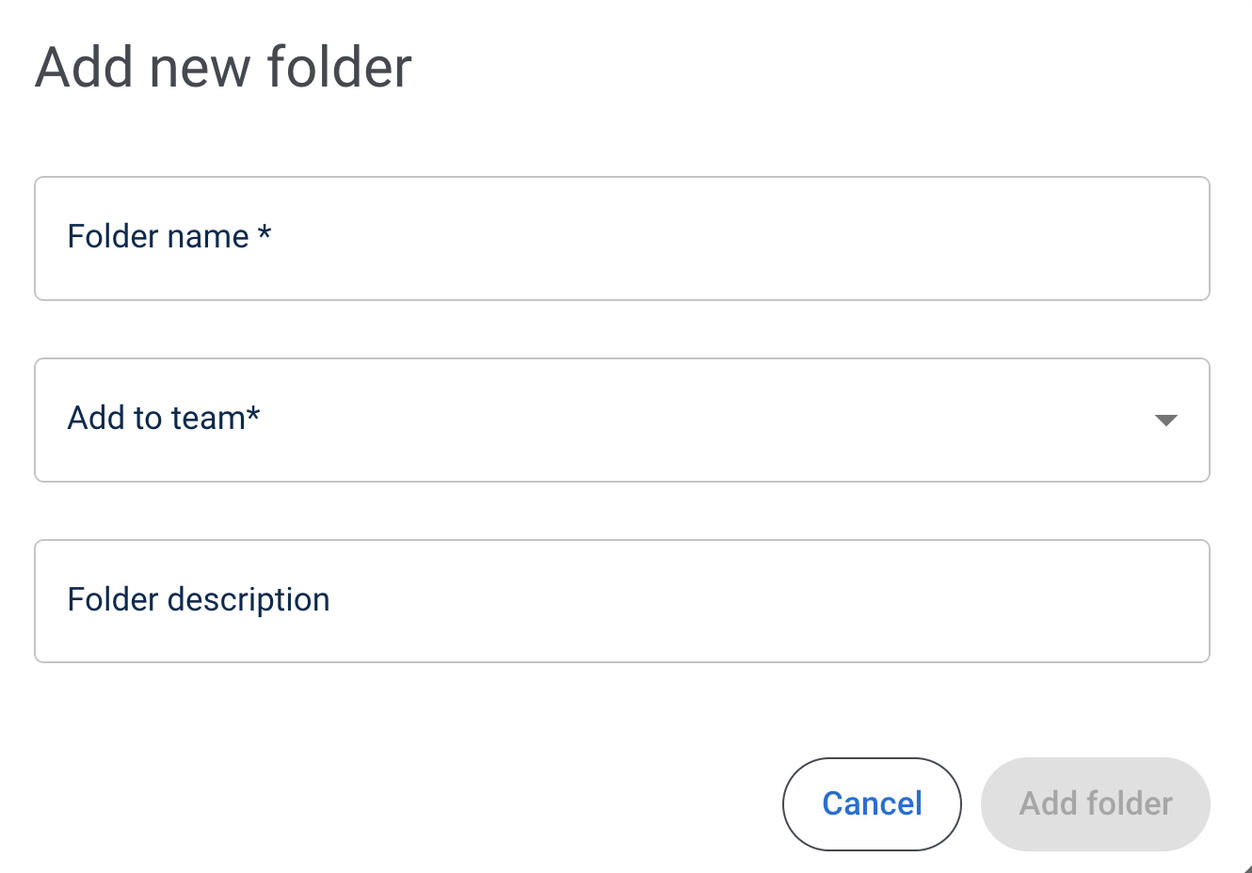
2. Give your folder a name so everyone that has access to it knows what boards it contains, e.g. "Marketing," "Clients," "Events," etc.
3. Add it to the team you want to give it access to
4. Add an optional brief description to further clarify its content to save people time
Creating Boards
Method 1: Using Templates
Navigate to your desired folder (e.g., "demo" folder).}
1. Locate the blue "Create Board" button on the right side of your screen.
2. Click on "Create Board".
3. Choose a template from the available options.
4. Name your board (e.g., "New Board").
5. Review the description of the selected template.
6. Click "Create Board" to finalize.
The new board will appear in your chosen folder.
7. Click on the board to view and interact with it.
** Remember to periodically save the board as you use it with the "Save board" button.
Method 2: From a File
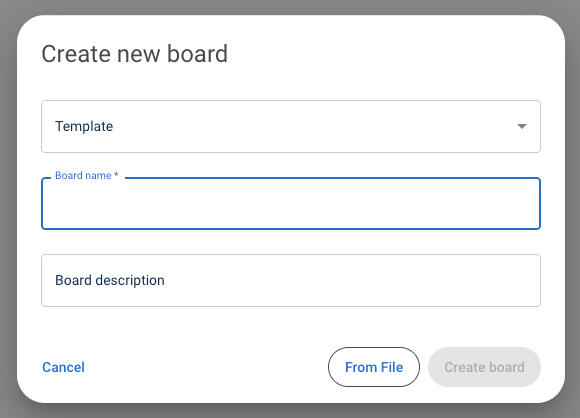
1. Click on "Create Board".
2. Select the "From File" option.
3. Locate your previously downloaded board file.
4. Drag and drop the file into the designated area.
5. Click "Create Board" to finalize.
Organizing Boards in a Folder
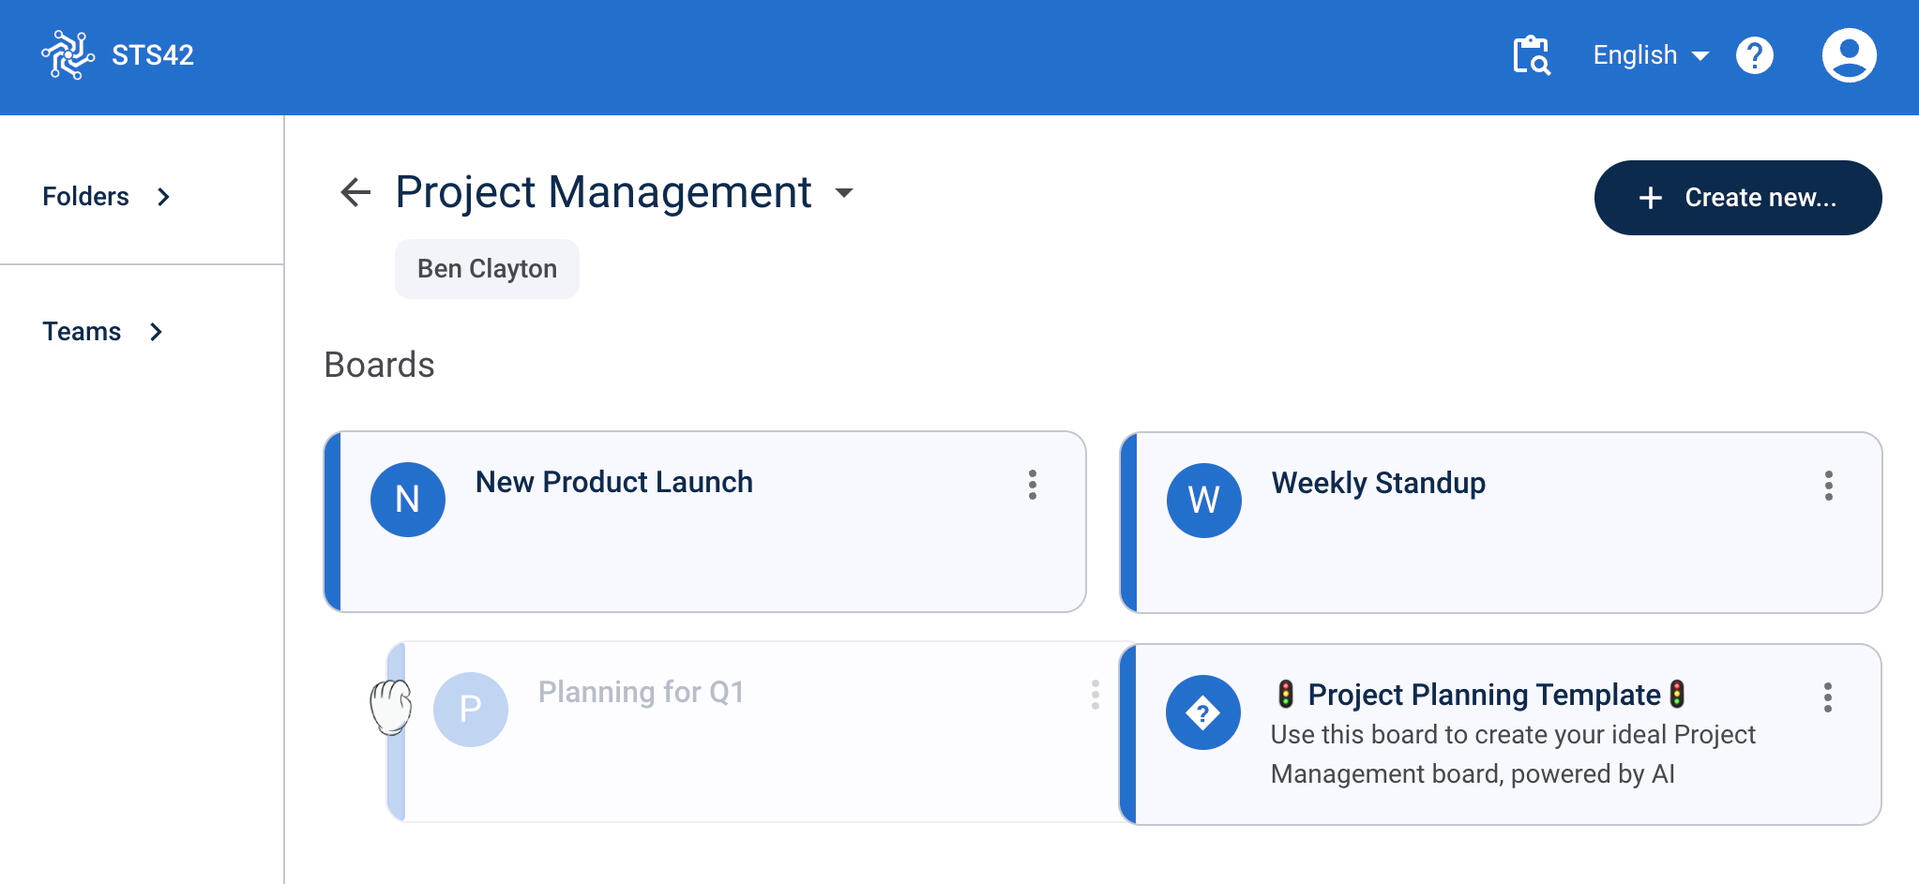
To keep your folders organized, you can easily move your boards in the order you prefer. Simply click the blue edge on the right side of a board and drag it to your desired location.
Moving Boards Between Folders
Moving a board between folders helps you keep your boards organized, e.g., by department or topic.
You also can manage access to your boards by placing them in folders shared with specific people. To make a board private, simply move it to a folder that only you can access.
So it's important to keep in mind, when you move a board, only people with access to the new folder will be able to see it.
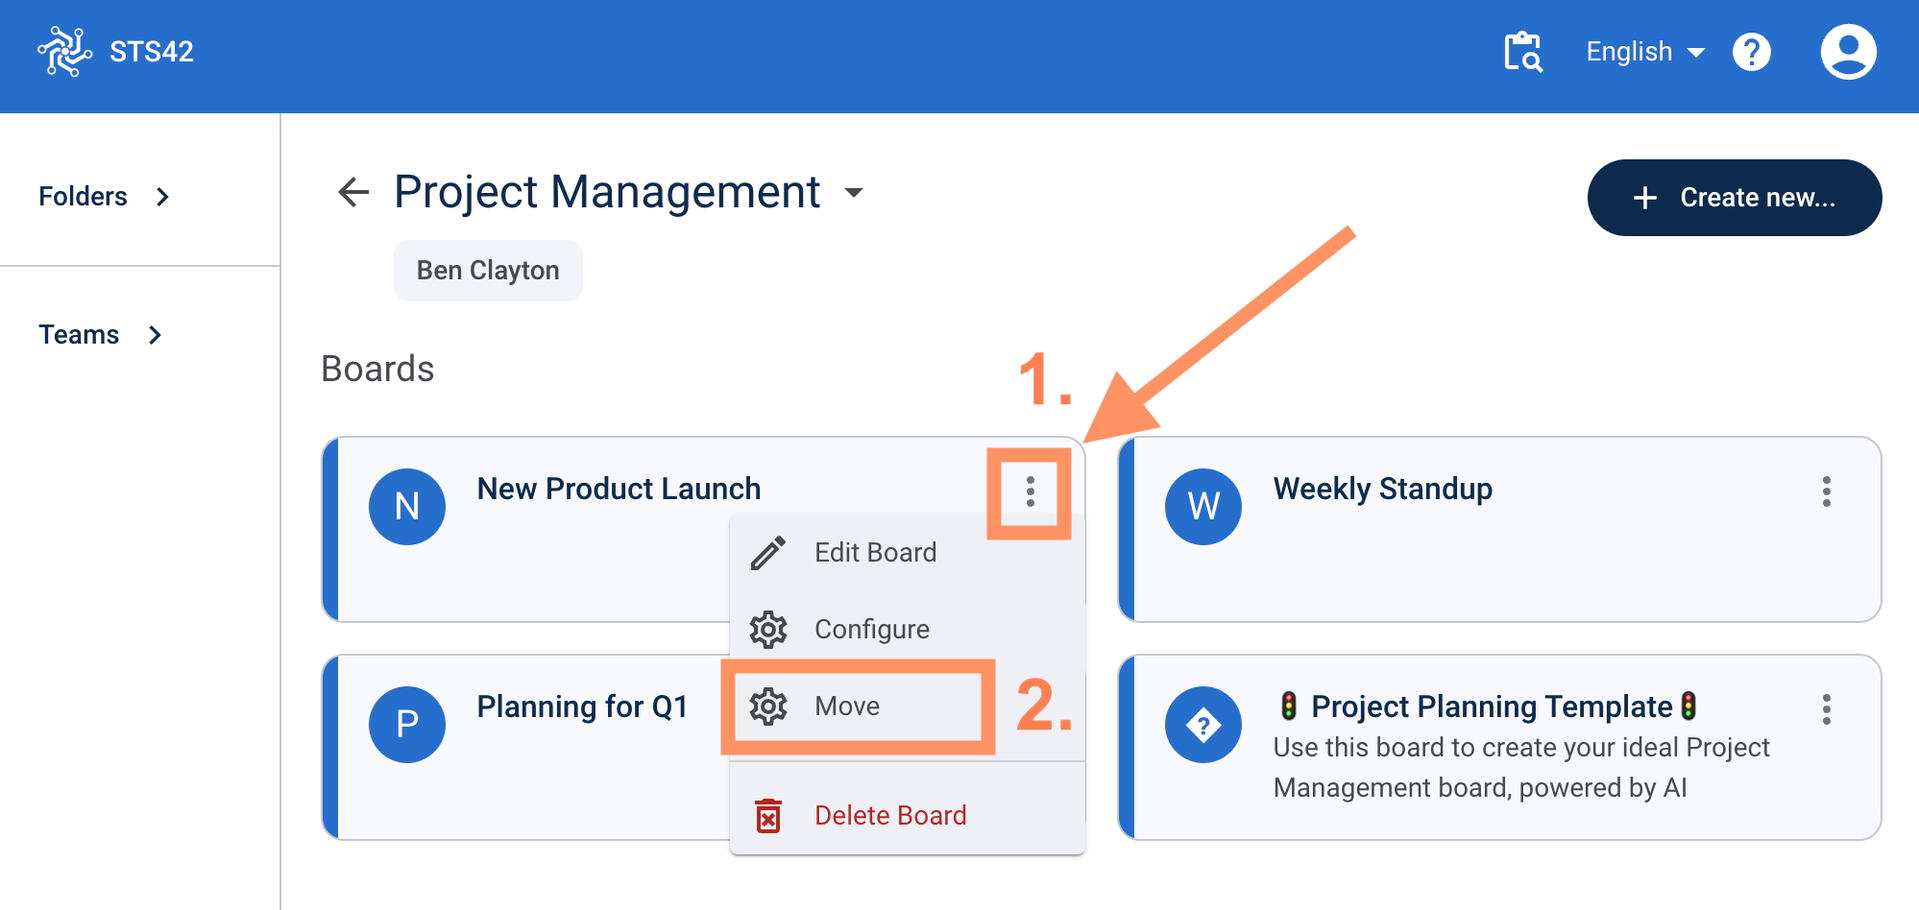
1. In the folder view, click on the 3 dots to the right of the board name you want to move
2. Click "Move"
3. Choose the folder you want to move the folder to
Create a Folder within a Folder
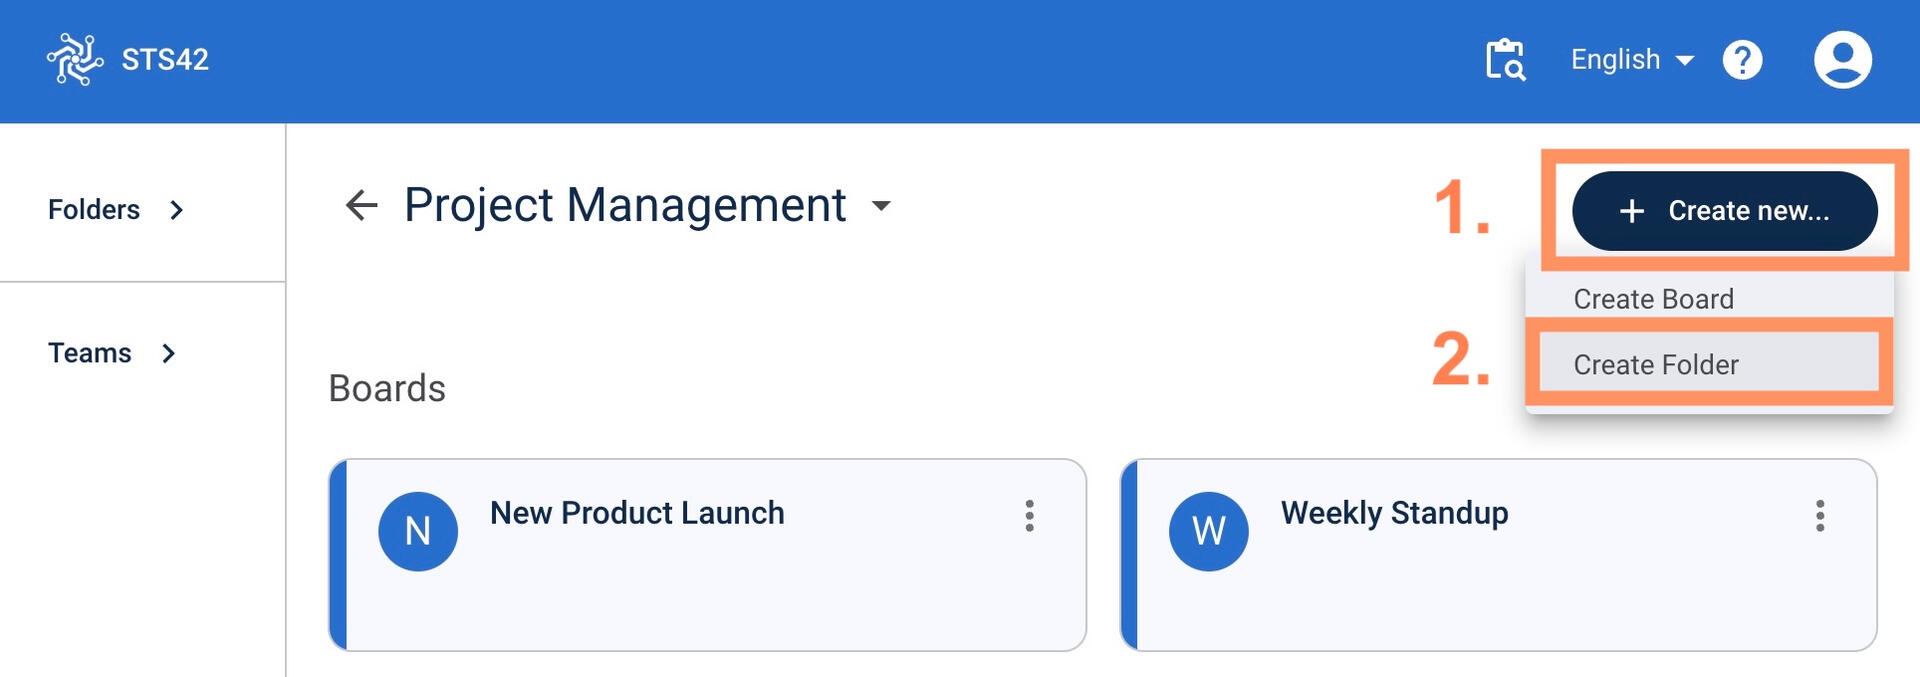
As you create more boards, it will become important to keep your boards organized so you can find them easily the next time you need them. One way to do this is by nesting folders to reduce clutter in the main view. For example, in a company folder, you might have "Meetings" as a folder and "Sales Meetings" as a subfolder
To create a folder within a folder, simply click on the "Create new" button in the top right of your folder and select "Create Folder"
To Move a Folder to Another Folder
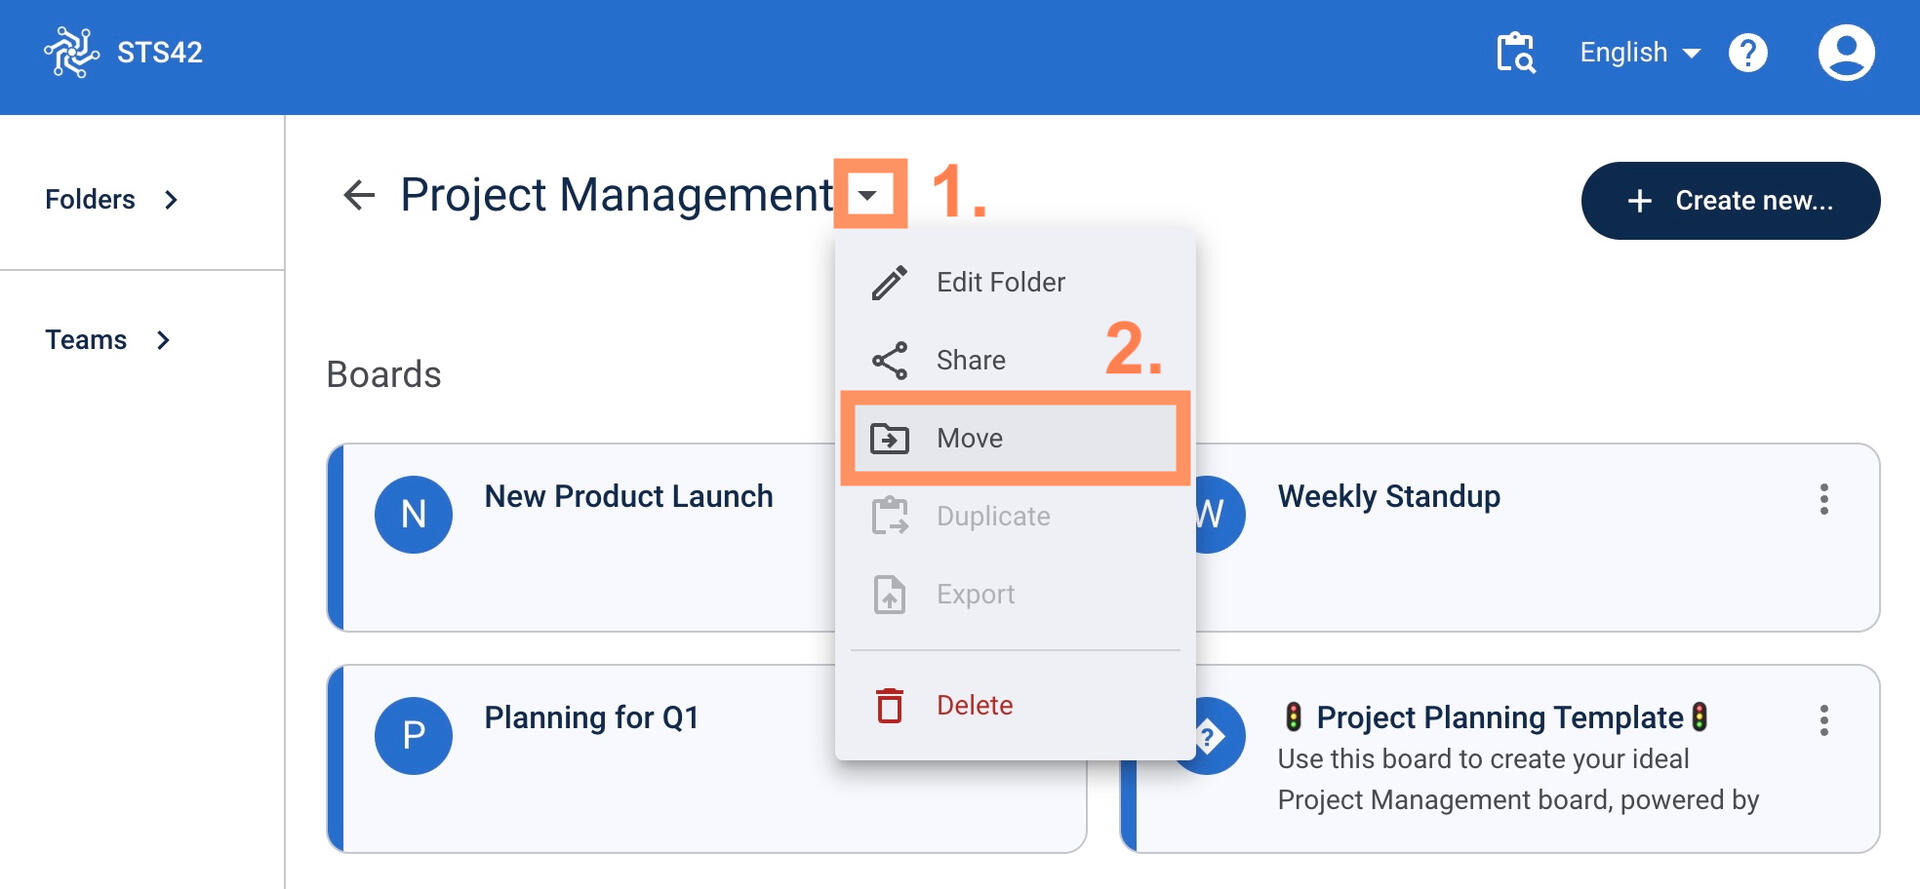
If you want to move a folder to another
1. Open the folder you want to move and click on the dropdown menu to the right of the folder name
2. Click "Move"
3. Select the folder you want to place it in
Working in Boards
Save + Share Your Work
Steps to Backup Your Work:
Your work is automatically saved as you work, however you can create a backup file. Details below.Sharing Boards
There are two ways you can share your boards as you work.
The first option is with the share feature, the second is by creating a JSON file you can download and share.
SHARE A LINK - NEW FEATURE!
1. Click "More Options" (three dots) at the board level2. Select "Share board" from the menu3. In the share dialog, you can:
• Copy the link directly, OR Edit the link slug (last part of URL) to make it memorable
• Set an expiry date for the link
• Add a custom expiring message4. Click "Save" to finalize settings5. Copy and share the link with your teamSave Board as a JSON File
1. Click on the "Save Board" icon on the right of the menu bar. The board "json" file will automatically download to your computer.
2. Return to the Folder that houses the board you are working on
3. Click "Create new Board"
4. In the pop up window, click "From File"
5. Choose the json file that you just downloaded
6. Optional: rename the file if you would like.
7. Click "Create board"
You now have the saved board as a backup1. Give your json file to someone else on the STS platform:*
Once you have downloaded the json file following the steps above, you can simply share it with a team member or someone else on STS. They then can create a new board, following the steps 3-7 above. Now they have a duplicate or your board and use it independently.
2. Create a new board from your json file in a shared folder:
Following the steps for backing up your work above, you can open a folder you share with others and create your new board from the file. Now, all members of that folder will be able to see your board.
Adding Frames, Lists, & Cards
Understanding the Grid System:
💡 STS works on a grid layout
😀 The grid expands with more columns (left or right) or rows (above or below) as you add more frames or lists
Open a board in one of your folders in STS https://app.sts42.com
Adding Frames:
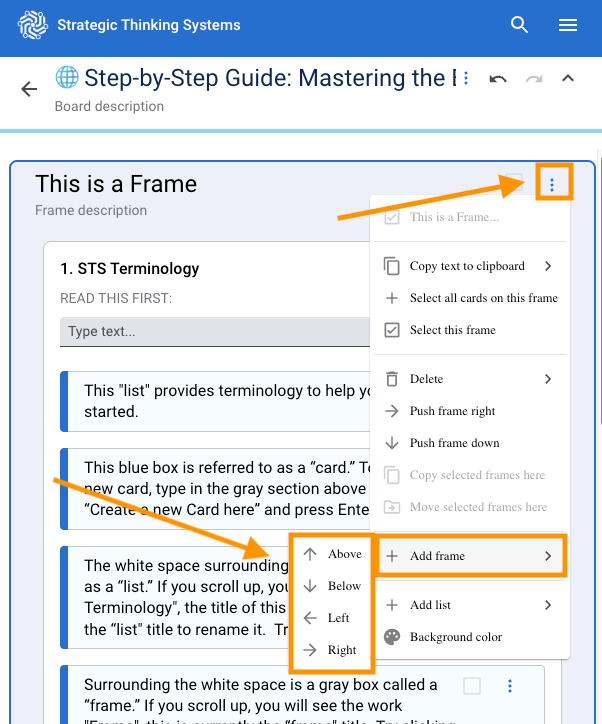
1. Click on the 3 dots at the top right of a frame.
2. Click on "Add Frame" near the bottom of the menu.
3. Select the desired direction to add a new frame (to the right, left, above, or below the frame you are on)
Adding and Deleting Lists:
Adding Lists:
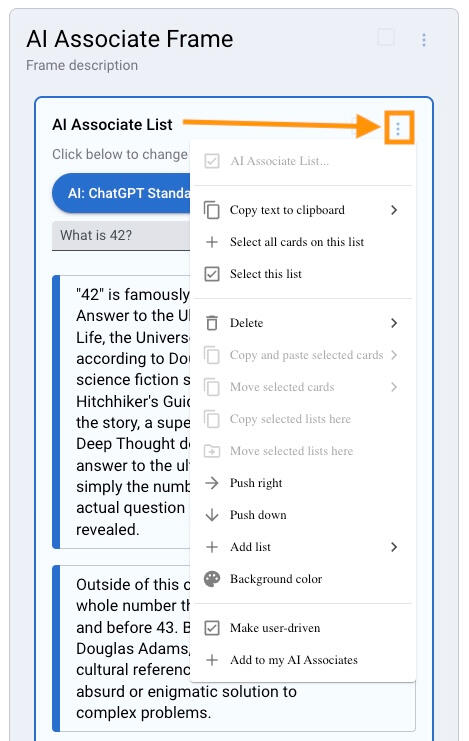
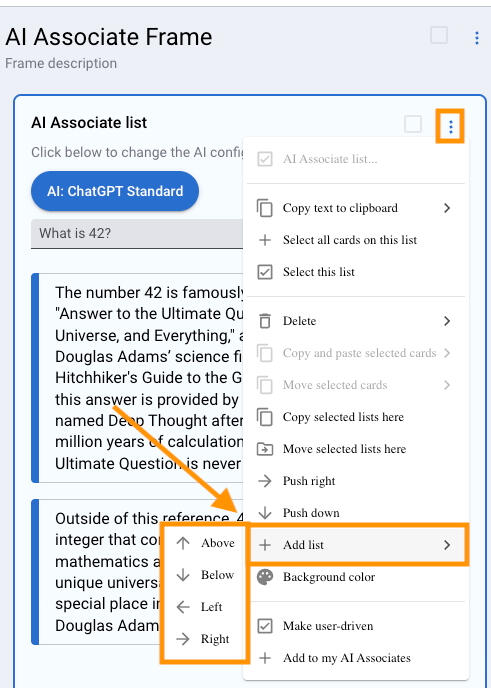
1. Click "More Options" (three dots) on an existing list2. Click "Add list" to expand directional options
3. Choose position: Above, Below, Left, or Right
4. New empty list appears in selected position
5. Click on list title to rename it
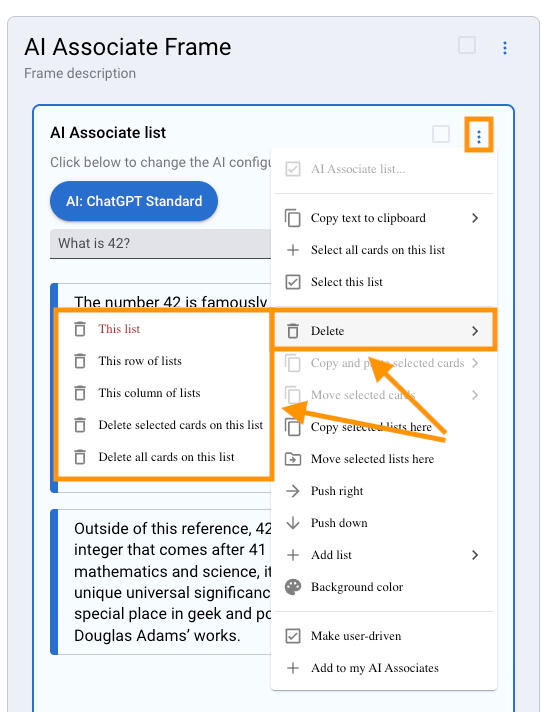
Deleting Lists:
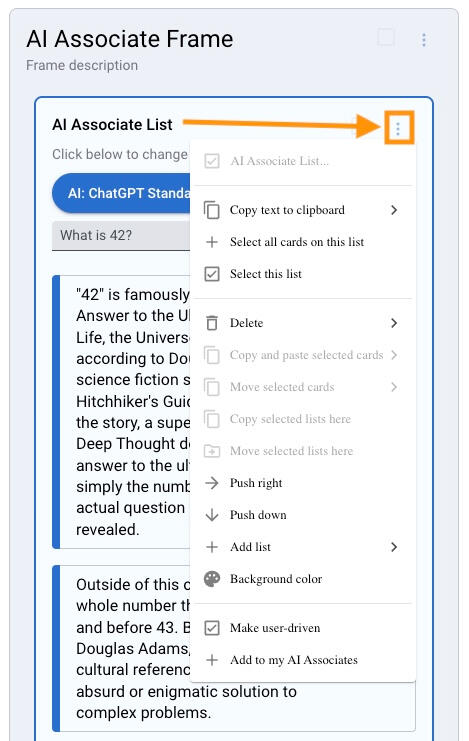
1. Click "More Options" (three dots) on an existing list2. Click "Delete" to expand directional options
3. Choose between
- This list: the list you are on
- This row of lists: You can have multiple lists side by side (in a row) or stacked vertically (in a column).
If you have one list in a the frame you are in, it will delete the lists on this vertical level with
4. New empty list appears in selected position
5. Click on list title to rename it
Adding or Removing AI from a list
You can configure an existing list to have AI or to remove it
1. On a list you want to turn to an AI or user driven list, click on the 3 dots ("More options") at the top right of the list
2. Near the bottom of the list, choose "Make AI-driven" or Make user-driven" depending on your needs.** More information about configuring AI Associates below
Customization:
🔬 Experiment with different combinations of frames and lists
👍 Design your STS board layout according to your needsRemember:
👉 Grey areas are frames
👉 White areas inside the frames are lists
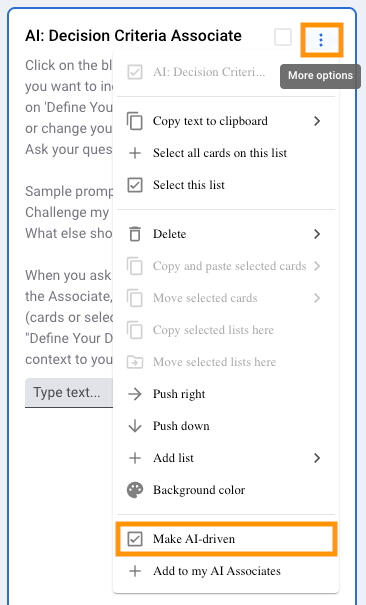
"Make AI-Driven": Add AI to a list
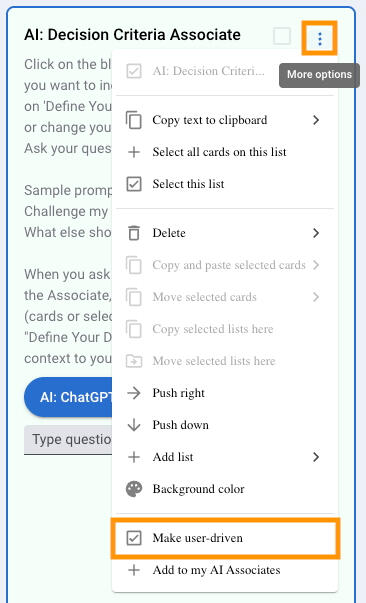
"Make User Driven": Turn a list from AI to user-driven
How to Create Cards
1. In a List, type in the grey section labeled “Type text”
2. Hit Enter / Return
Your new card will be at the bottom of your list
Moving Frames & Lists
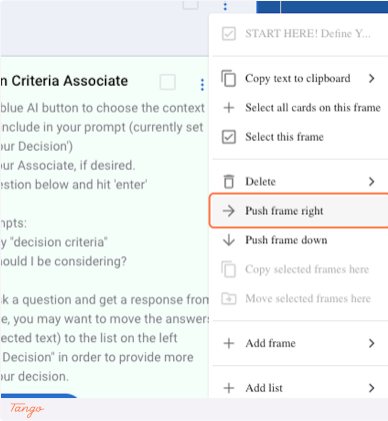
Push Frame
1. In the frame you want to move, click on the 3 dots "More options" menu.
2. Chose the direction you want to move the frame, to the right or down
Copy or Cut and Paste Frames
You can move or create a copy of a frame:
1. Click the checkbox on the frame you want to move.
2. Click on the 3 dots More options menu of the frame you want to move your frame.
3. Select Copy selected frame to create a copy or Move selected frame to move it to the new spaceThe frame you want to move will now fill the empty frame space or replace an existing frame (Frame B).
If you replaced an existing frame (Frame B), Frame B will be moved down to the next row on your board.

Additional Tips👍 You can push lists in different directions to create new spaces.
👍 Save frames, lists, or entire boards as templates for future use.Remember, STS is designed for flexibility in working with complex ideas and facilitating decision-making. Don't hesitate to experiment with different layouts as your ideas evolve.
Moving Cards
How to Move One or More Cards
*There are two ways you can move cards.
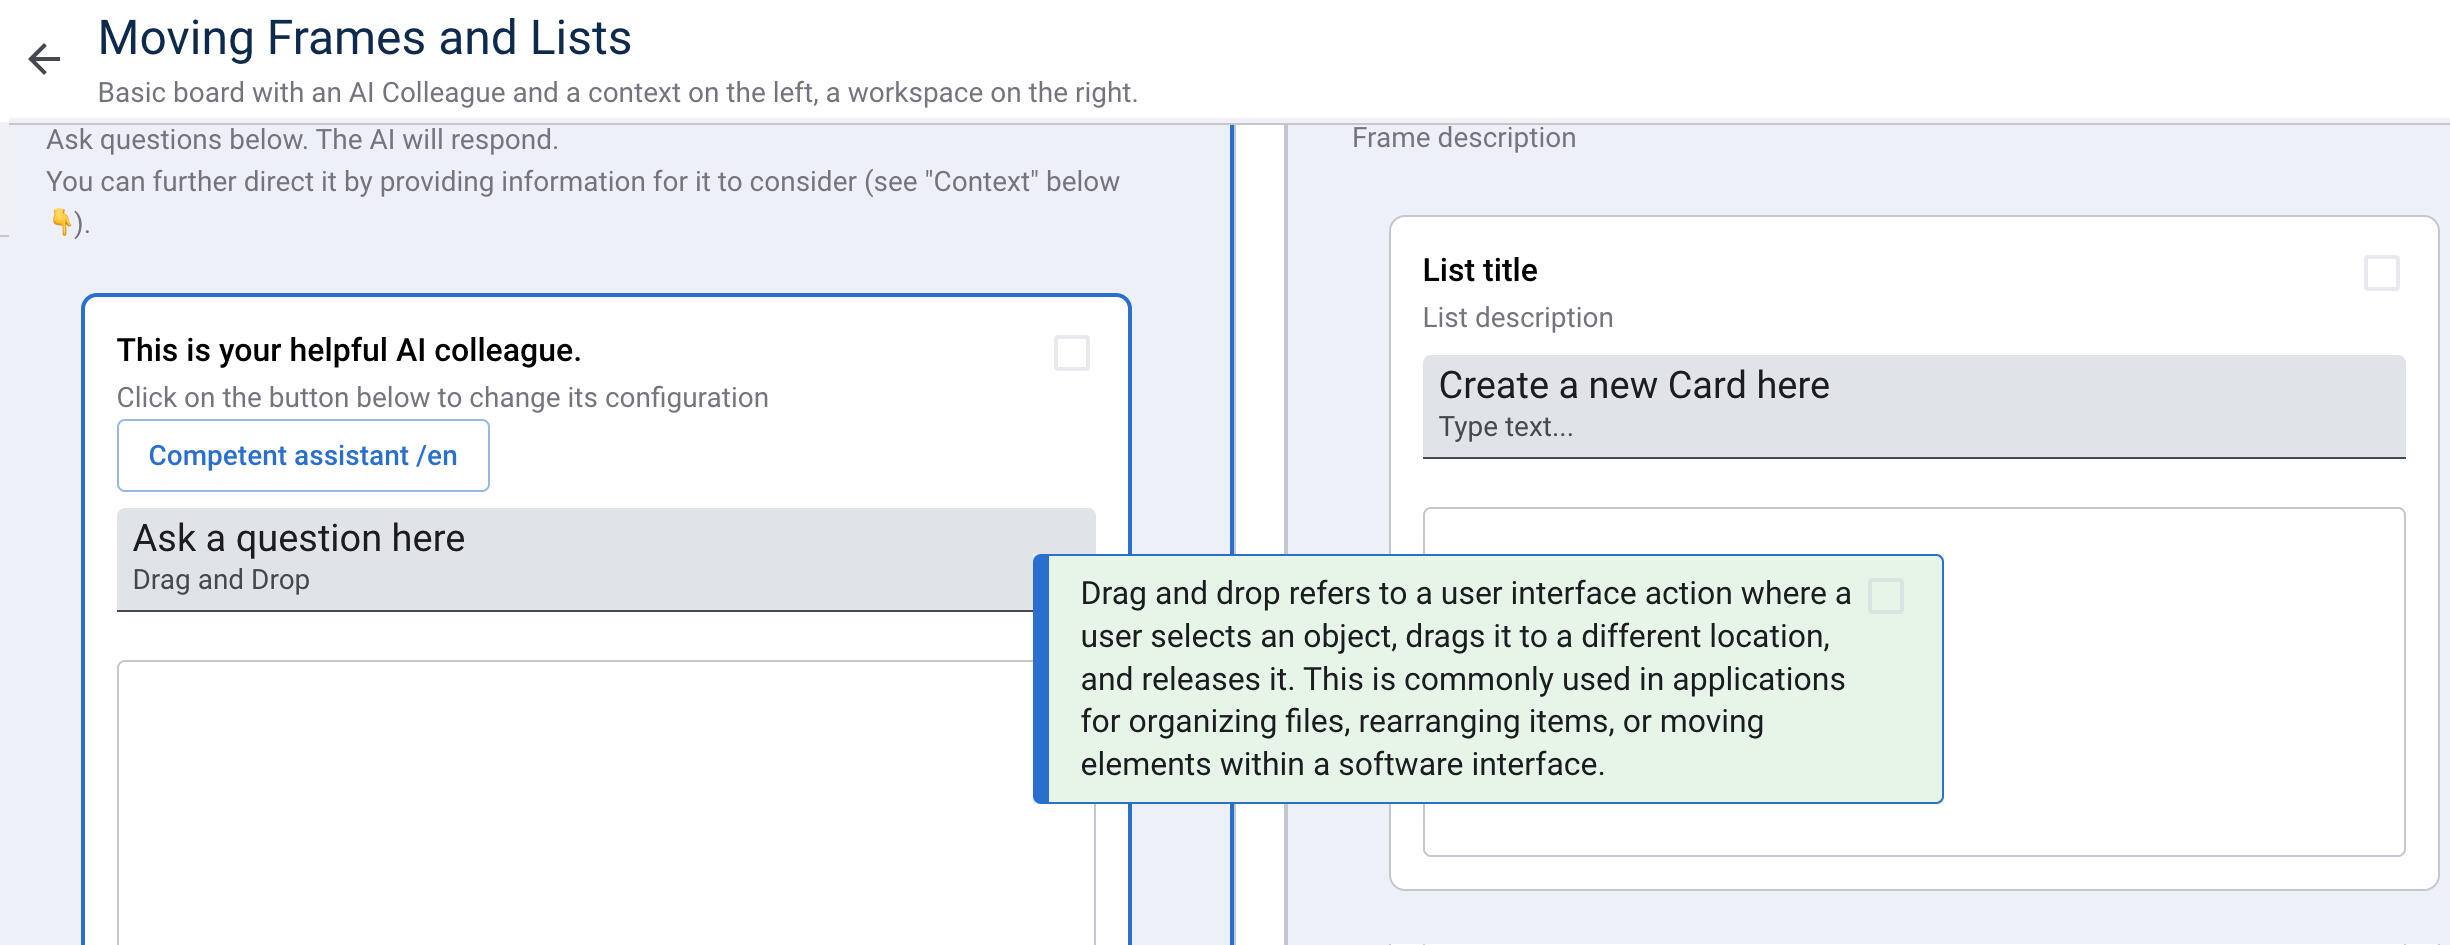
Drag and Drop:
1. Click on a card to select it
2. Drag the card to the desired location
3. Release to place the card above or below other cards in the new listThis is a quick way to move one card, but if you want to move more than one or across the board, you can move more than one at a time.
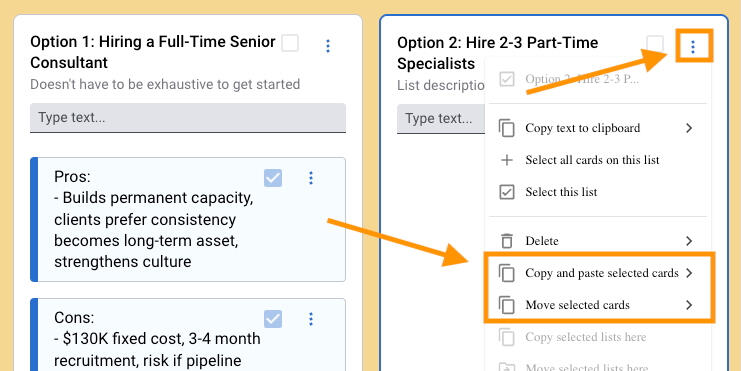
Using Copy or Cut Paste:
1. Click on the checkbox in card(s)
2. Click on the white area of destination list and ensure it is now highlighted by a blue border. This indicates the list that you will move it to.
3. Click on "Selected Cards: from the top menu
4. Choose "Copy" to duplicate the card or "Cut" to move it.
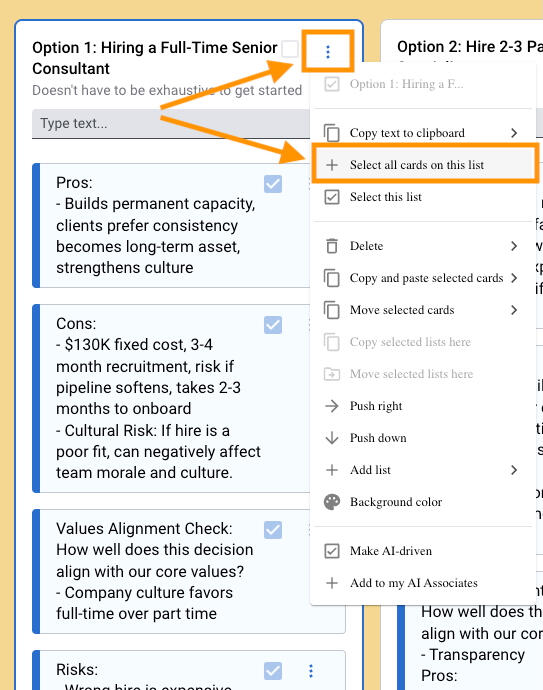
Selecting All Cards in a List:
1. Click on the 3 dots More options menu
2. Click "Select All Cards on the list"
NEW FEATURE! Undo and Redo!
How to Undo & Redo Your Work
1. Locate the Undo (↶) and Redo (↷) buttons in the top-right corner of the board2. Click Undo (↶) to reverse your last action3. Click Redo (↷) to restore an undone actionYou can undo actions up to 24 hours back.
When you use undo on a shared board, one that you are collaborating on, when you click undo, it only affects your actions, not team members' edits.
NEW FEATURE! Colors
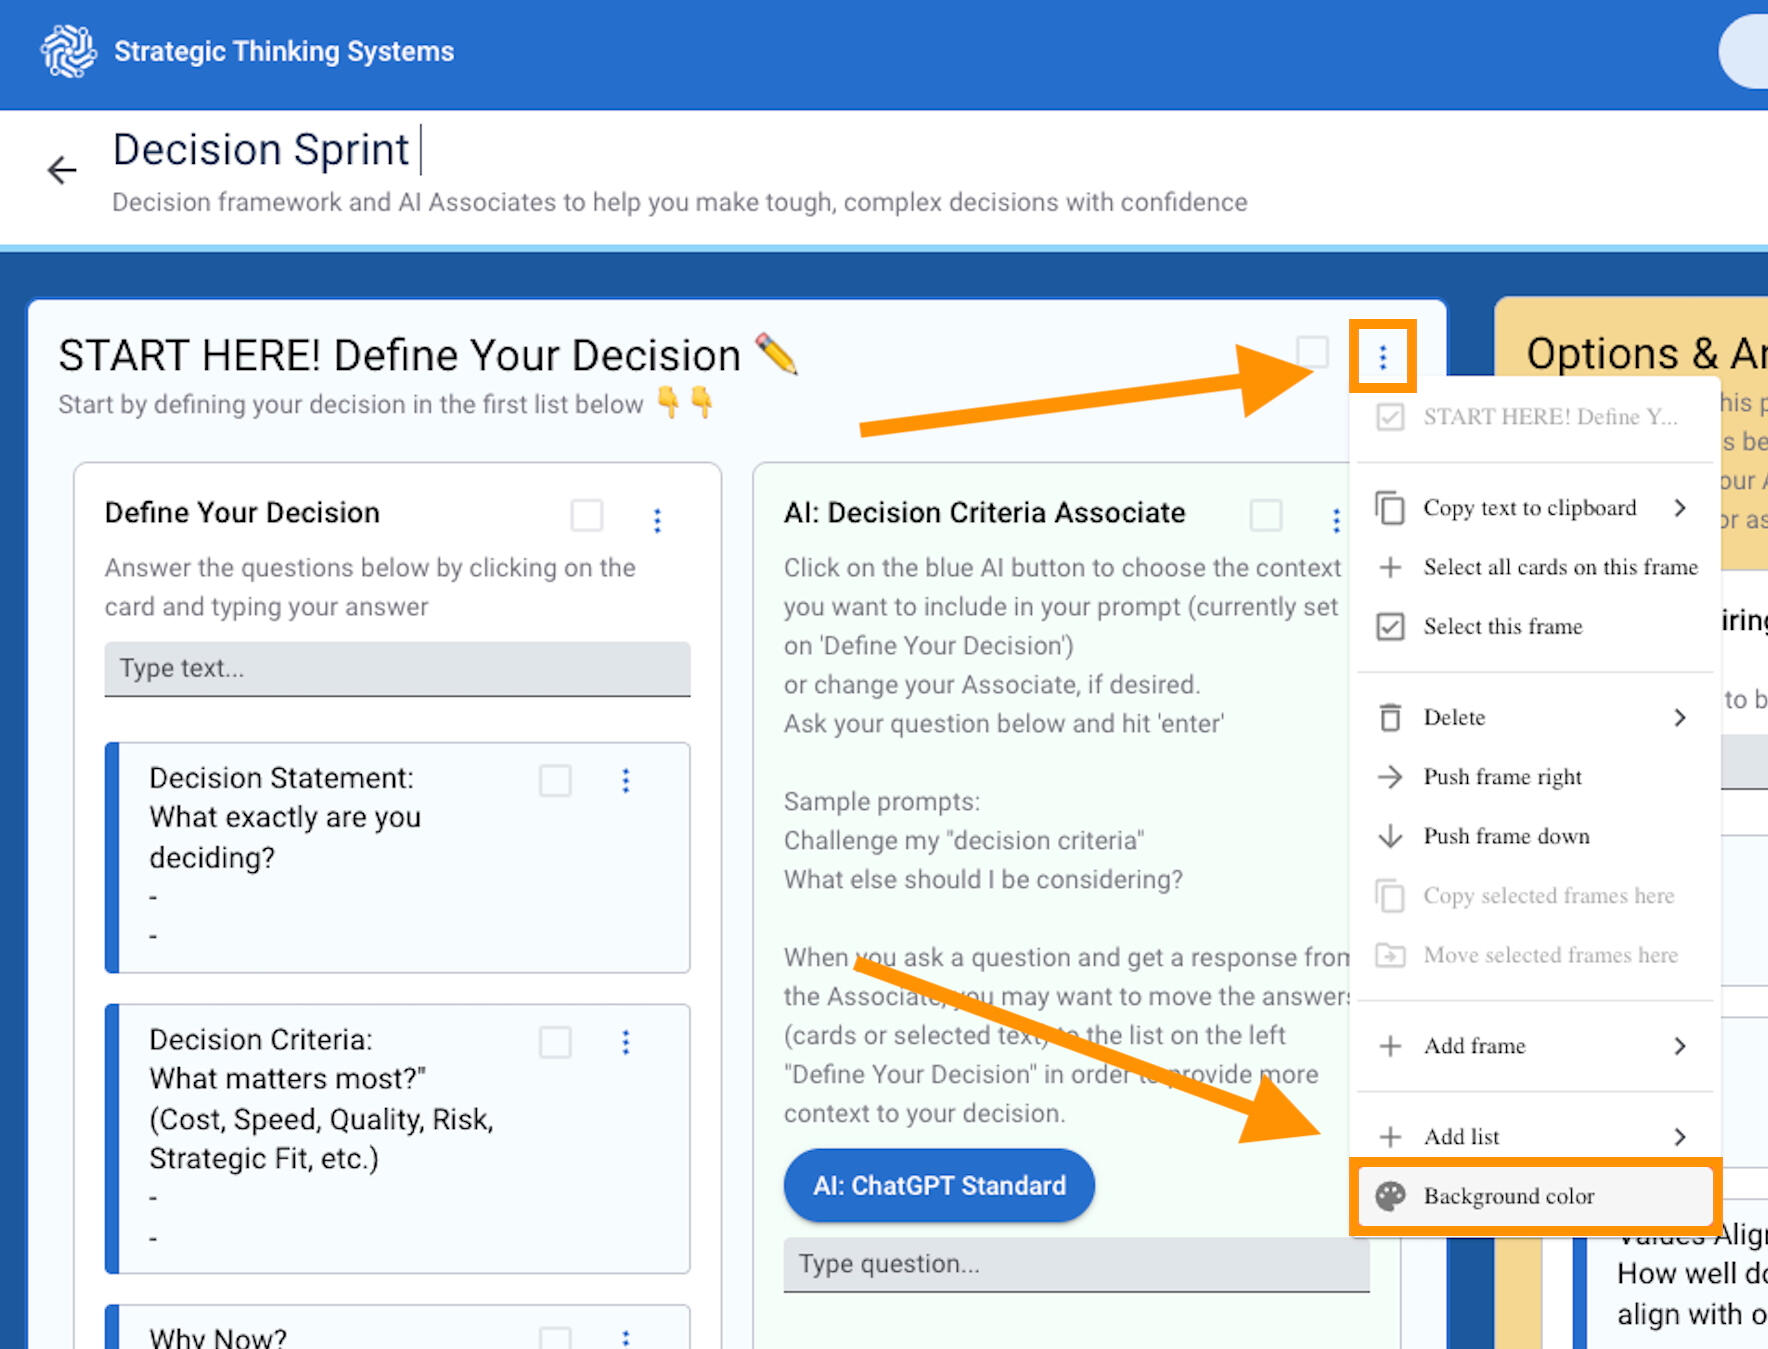
How to Change Background Colors
1. Click "More Options" (three dots) on a frame or card
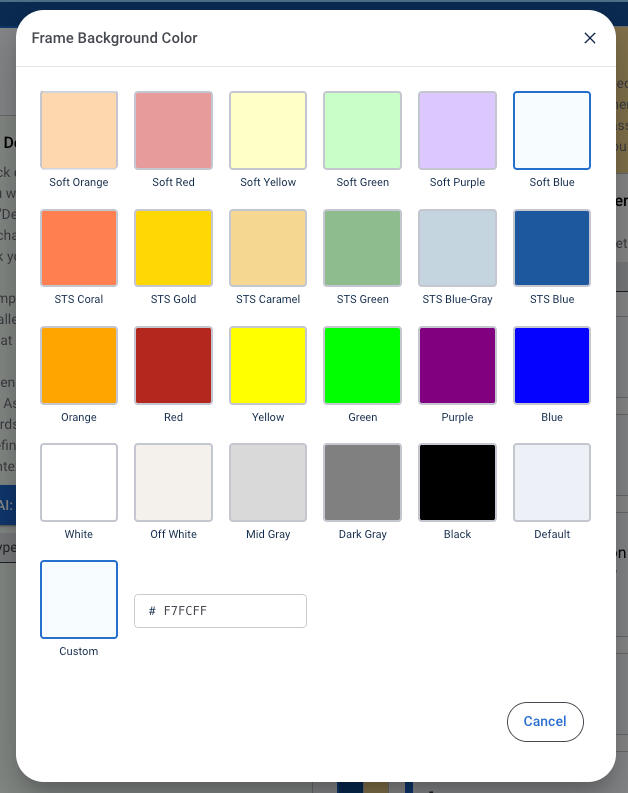
2. Scroll down in the menu to find "Background color"3. Click "Background color" to open color picker
4. Either:
Select a preset color from the palette, OR
Click "Custom" and enter a hex code for brand colors5. Color applies immediately to the selected element
The Clipboard
Using the Clipboard:
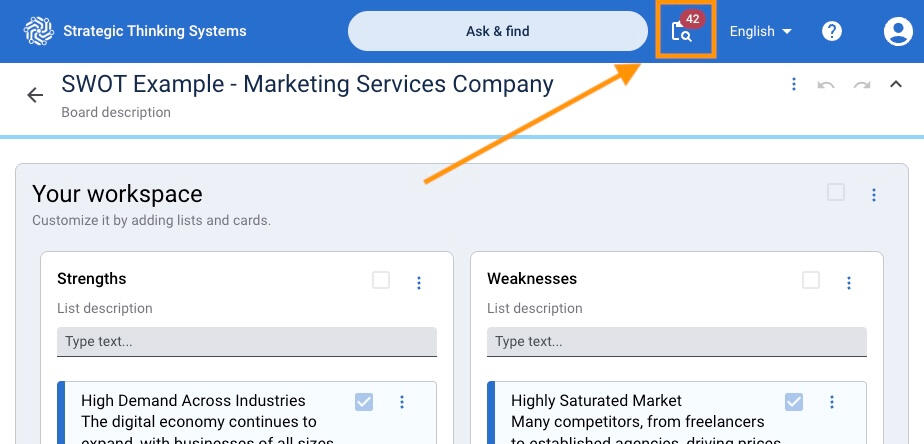
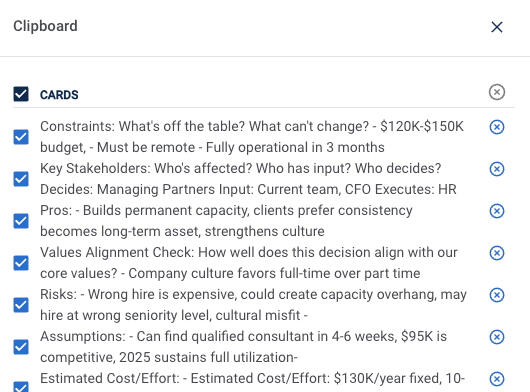
Once you have clicked on the checkbox on a Frame, List, or Card, they are added to the clipboard. Similar to copy/paste on your computer, when you copy an item, it's available on the "clipboard" until you paste it or clear your clipboard.👉 To view copied items, click on the clipboard icon in the upper right corner of the board.
👉 To remove items from the clip board, click on x to the right of them individually or x at the top of the clipboard.They will also be removed when you complete the "Cut & Paste" or "Copy & Paste" functions
Al Associates
By configuring the AI colleague, you are able to work with specific characteristics and roles to suit your requirements for research, analysis, writing, and so on.
Here's how you configure an AI Colleague
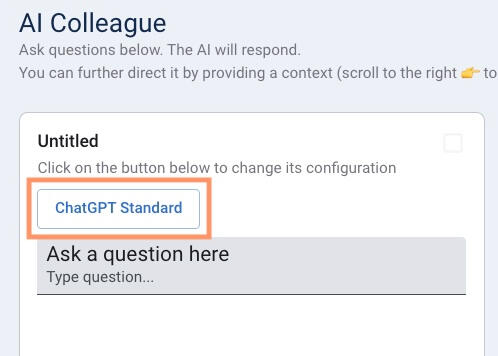
1. Click on an Al Colleague to open configuration options.
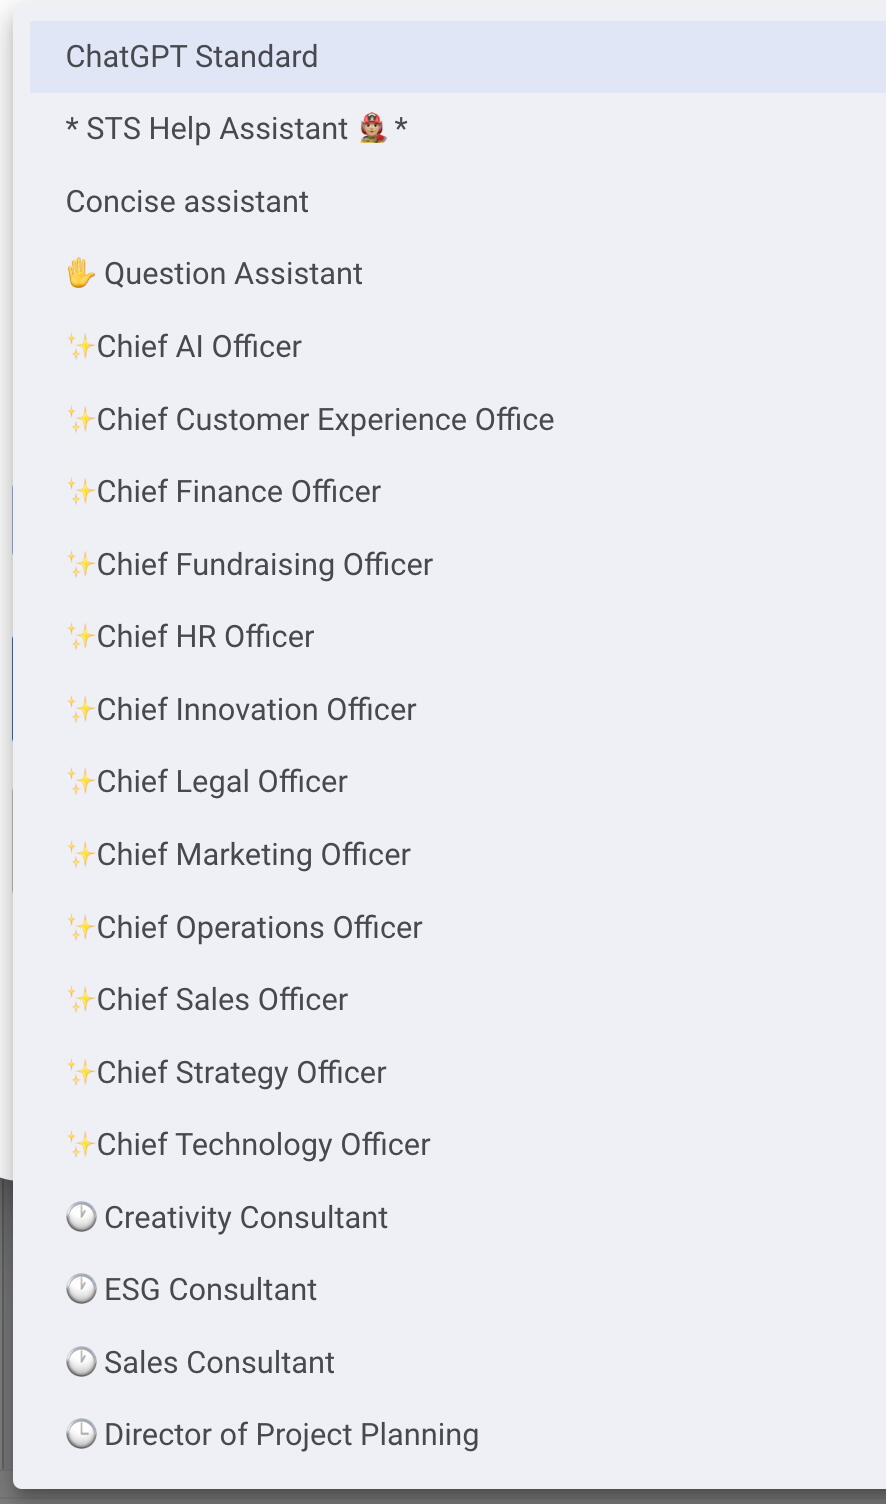
2. Choose the Al personality you want for your colleague.Here are your available AI Colleagues (Contact STS for custom built AI Colleagues):
✨ ChatGPT Standard (currently ChatGPT 4Omni)
✨ * STS Help Assistant 🚒 * (to ask quesitions about how to use STS)
✨ Concise Assistant (for short, to-the-point responses)
🖐️ Question Assistant (great for getting started and asking great questions to help build relevant context)
✨ Chief AI Officer
✨ Chief Customer Experience Officer
✨ Chief Finance Officer
✨ Chief Fundraising Officer
✨ Chief HR Officer
✨ Chief Innovation Officer
✨ Chief Legal Officer
✨ Chief Marketing Officer
✨ Chief Operations Officer
✨ Chief Sales Officer
✨ Chief Strategy Officer
✨ Chief Technology Officer
🕕 Creativity Consultant (for content writing, blog posts, social media)
🕕 ESG Consultant (for environmental, social, governance issues)
🕕 Sales Consultant (for expanding sales)
🕕 Director of Project PlanningSee the Video for Template #03 below starting at minute 1:19
Adding a Website Link to a Card
How to add a Website to a Card
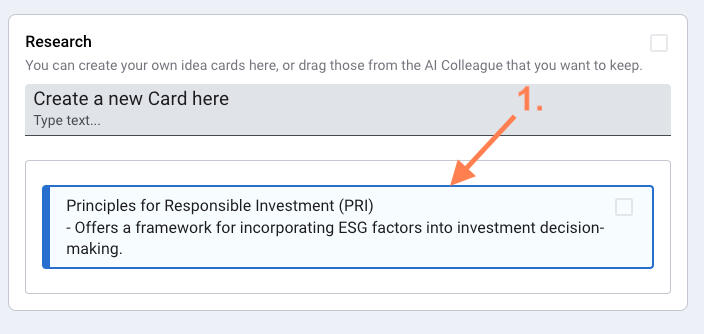
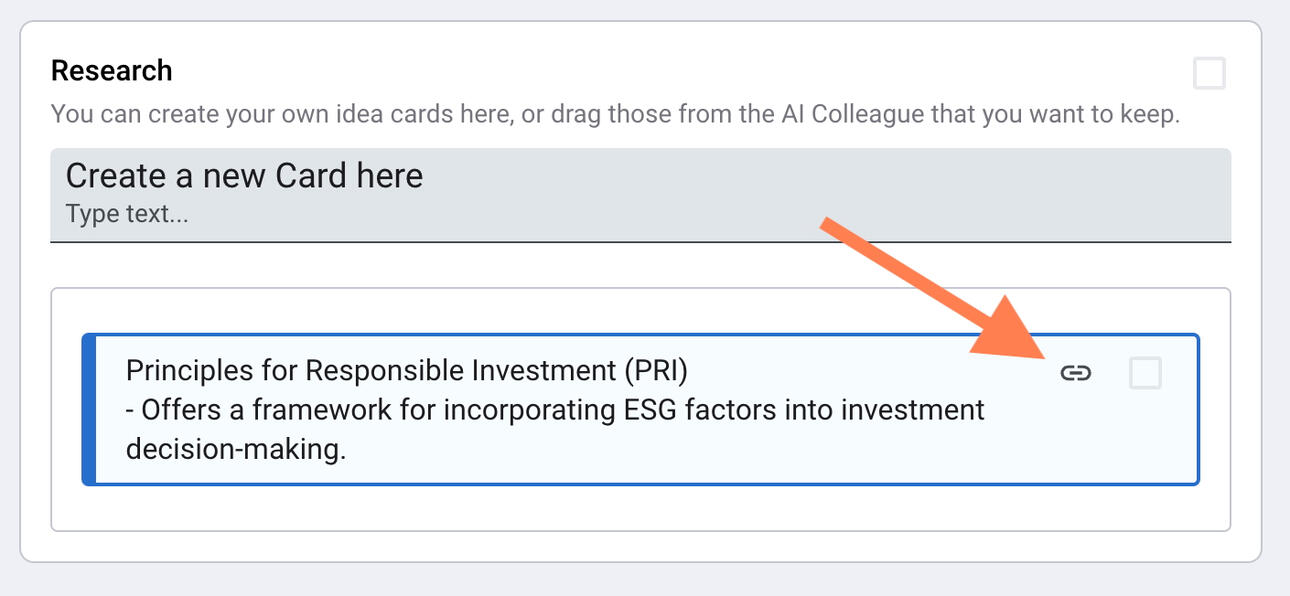
Adding a link to a Card makes it easy to access additional resources or information you need for research or strategic work.Here's how you do it:
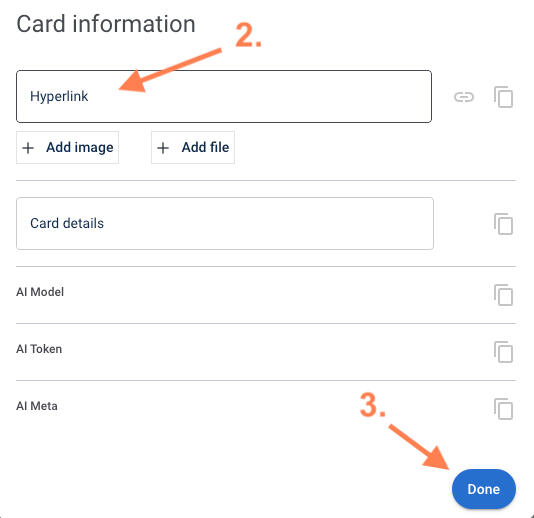
1. Click on the card you want to add a URL to. Once clicked, the card will be have a blue border.
2. Add the URL to the "Hyperlink" field.
3. Click "Done"Now you will be able to click on the hyperlink icon on the card and the website will open in another window.
Exporting a Board as an Asset
How to Export Your Board as a Sharable Asset
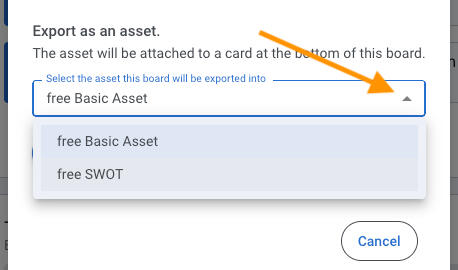
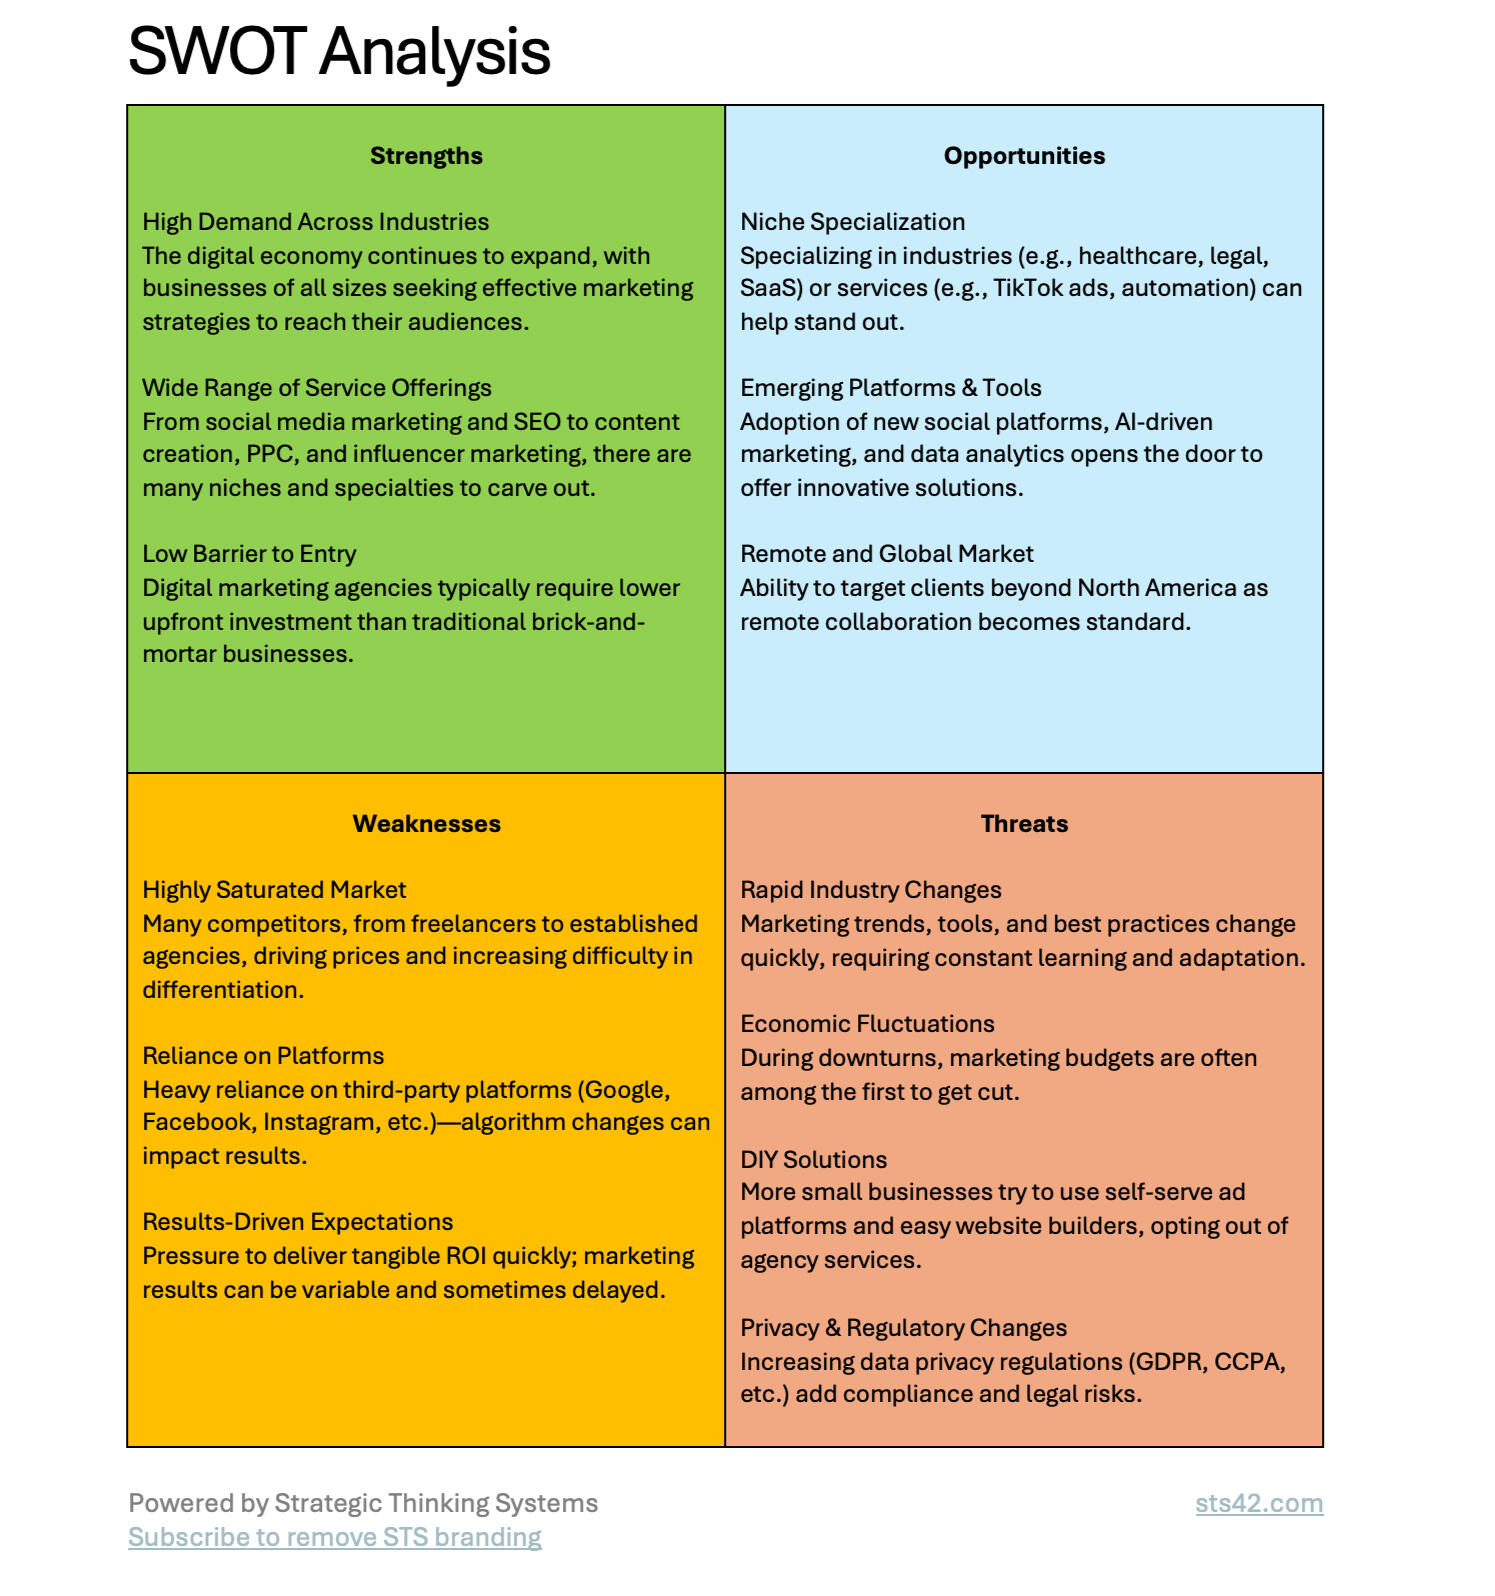
You can export your board to share outside of STS as a sharable asset. We currently have two free formats "Basic Asset" and "SWOT."
For the Basic Asset, each frame and lists will be added to your document in the order they appear, from left to right.
For the free SWOT Asset, you need to have a list for each section: Strengths, Weaknesses, Opportunities, Threats. Each list will populate those sections in the asset. See screenshots for examples.
To export as an asset:
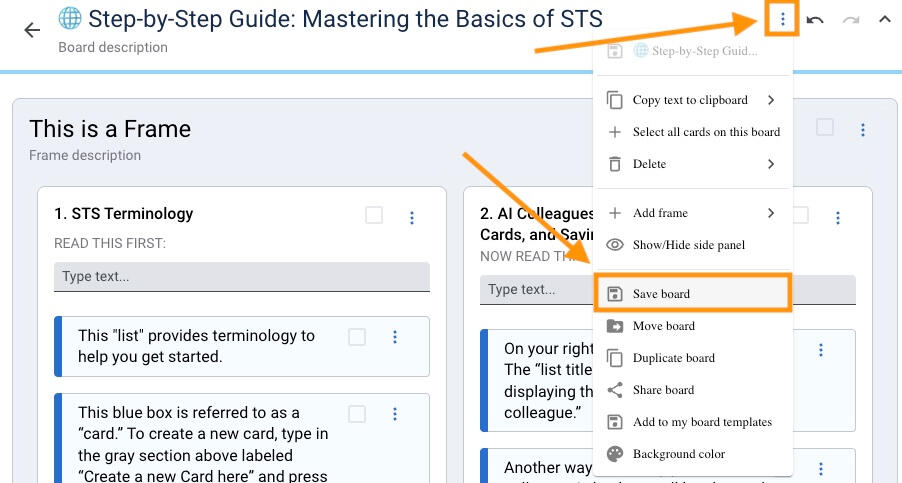
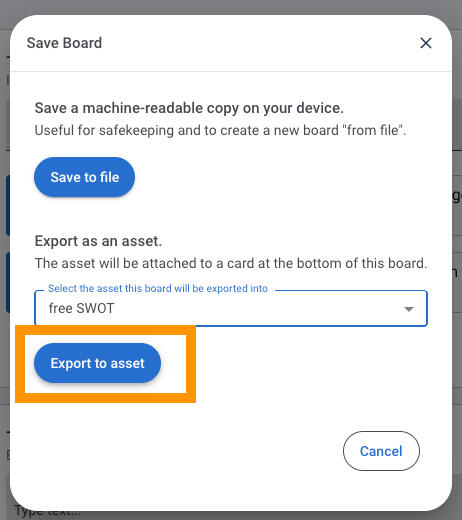
1. Click the "Save Board" button on the top bar of your board.
2. In the popup window, click the dropdown menu and select, "Export as an asset" and choose the format you want.
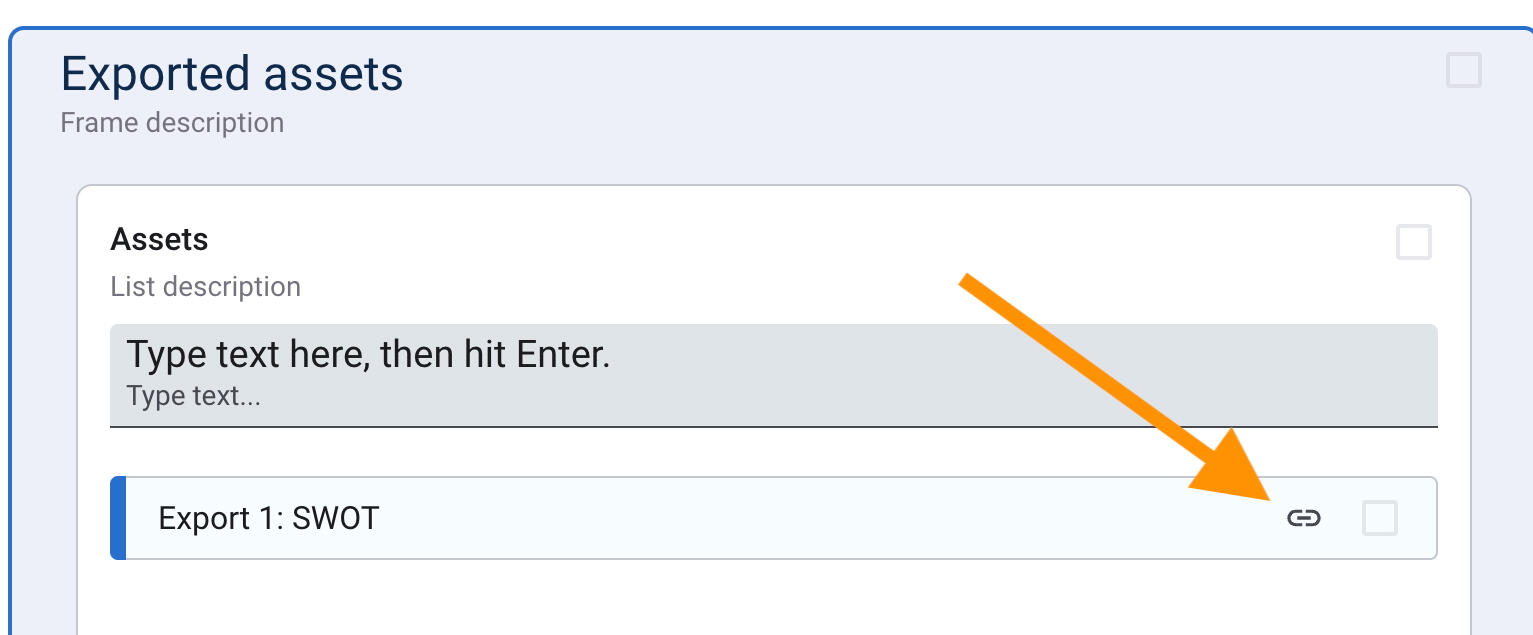
3. The asset will be added to a new frame at the bottom of your board. Scroll to the bottom of your board to the new "Exported assets" frame and "Assets" list. Click the link icon on the card Export 1: Basic asset (or SWOT, if that's what you selected).
4. Your asset will download to your downloads folder on your computer.

Demos
How to Get Started Using STS
How to Get Started Using STS
In this comprehensive tutorial, you will see how to get started using STS and how to use the Question Assistant.In This Tutorial You'll Learn:
• How to navigate STS for maximum efficiency
• Using the Question Assistant to uncover crucial planning considerations
• Converting vague challenges into structured action plans
• Leveraging AI officers for diverse strategic perspectives
• Real-world application: Breaking down a business scaling strategy⏱️ Timeline:
0:00 - Introduction to STS
1:15 - Platform Navigation Basics
2:30 - Template Selection & Setup
3:45 - Question Assistant in Action
5:30 - Live Example: Business Scaling Strategy
7:15 - Working with AI Strategic Officers
8:45 - Implementation Tips & Next Steps💡 This Video is Helpful for:
• Getting Started
• Strategic planners and business leaders
• Project managers seeking efficient planning tools
• Teams tackling complex business decisions
• Organizations looking to enhance their strategic capabilities
Demo: Creating a Board from Template #00 One AI Colleague to the left
Discover how to leverage STS templates in this comprehensive demo. This guides you through getting started.This video covers:👉 How to use STS effectively
👉 Getting started with STS templates
👉 Generating business ideas with AI assistance
👉 Developing a marketing plan
...and much more
Demo: Creating a Board from Template #01 One AI Colleague in side panel
Discover how to leverage template #01 in this comprehensive demo to get started.In this video, we dive into the second STS template and demonstrate how to create a board and utilize the power of STS and AI easily.You could be facing a significant challenge, simply looking to brainstorm and organize your thoughts, or anywhere in between, this demo will guide you through the essential features of STS.
This video covers:
👉 How to create a new board using an STS template
👉 Leveraging STS to address big challenges
👉 Utilizing AI to identify and explore issues and key ideas
👉 Structuring your ideas and results effectively
👉 Developing actionable plans for your projects
Demo: Creating a Board from Template #02 One AI Colleague, Two Scenarios
Discover how to leverage template #02 in this comprehensive demo to get started.In this video, learn how to effectively explore different business scenarios and leverage adaptive strategic planning using Strategic Thinking Systems (STS).Scenario planning is a powerful process for navigating uncertain and rapidly changing market, business, environmental, and cultural conditions. STS enables you to set up and compare multiple scenarios. In this examples we look at the potential impact of standardized vs. falling interest rates, and generate tailored strategic recommendations from the AI assistant.You could be facing a significant challenge, simply looking to brainstorm and organize your thoughts, or anywhere in between, this demo will guide you through the essential features of STS.
This video covers:
👉 Create a new board using the "02💥One AI Colleague, Two Scenarios" template
👉 Leverage the STS AI colleague to provide customized recommendations for each scenario
👉 Collaborate with AI, edit the suggestions, and track the process
👉 Gather and copy context from other boards to set up your scenariosEmbracing an adaptive strategy, informed by AI-powered scenario analysis, can help your business be more responsive, resilient, and competitive. Try it now.
Demo: Creating a Board from Template #03 One AI Colleague, Two Perspecitives
Using Dual Al Perspectives to Drive Business Decisions
STS Template #03
Configuring the AI Colleagues and Saving Your conversationSTS Template #03 harnesses the power of dual Al perspectives to enhance analysis and decision-making processes.This template is designed to help navigate complex challenges by leveraging insights from two distinct Al colleagues with different specialities or personalities.The video illustrates how to give Al the context you want and it needs, generate ideas, and analyze responses From two Al colleagues, allowing you to compare Insights effectively.
